

Last Saturday, a local skipper found his GPS flickering out exactly 12 miles offshore, leaving him staring at a dead screen and a complex web of wires. It’s a scenario we’ve seen hundreds of times during our 30 years in the industry. Whether it’s salt air corrosion eating your terminals or the fear of a short circuit causing a fire, boat electrical system troubleshooting can feel overwhelming without a clear plan. You aren't alone in your frustration with intermittent power loss or wiring looms that look like a tangled bird's nest.
We agree that your time on the water is too valuable to spend chasing ghosts in the machine. This guide promises to help you master a systematic approach to diagnosing and fixing 12V marine electrical issues using professional-grade techniques. You’ll learn how to use a multimeter effectively and ensure every repair is completely waterproof. We’re here to help you move through a full diagnostic checklist and battery health assessment to ensure your vessel stays reliable for years to come.
Key Takeaways
- Understand the critical safety boundaries of 12V systems and why 240V shore power repairs must be left to the professionals.
- Master a systematic boat electrical system troubleshooting process by tracing power from the failing device back to the source.
- Identify how salt-air corrosion and engine vibrations compromise your wiring before they lead to a total system failure.
- Discover why mechanical crimping is the industry standard for creating durable, permanent connections that outlast traditional soldering.
- Implement a veteran’s bi-annual inspection routine to ensure your bilge wiring and terminals remain sea-ready year-round.
Mastering the Basics: A Reliable Veteran’s Approach to Troubleshooting
Mastering boat electrical system troubleshooting starts with a mindset shift. It isn't about guessing which wire looks "off." It's a systematic process of elimination. At Bivo, we've spent 30 years seeing how saltwater and constant vibration turn simple circuits into complex headaches. We treat every fault as a logic puzzle. You start at the power source and work your way to the appliance, testing each connection point until the signal stops. This methodical approach saves hours of frustration and prevents you from replacing perfectly good parts.
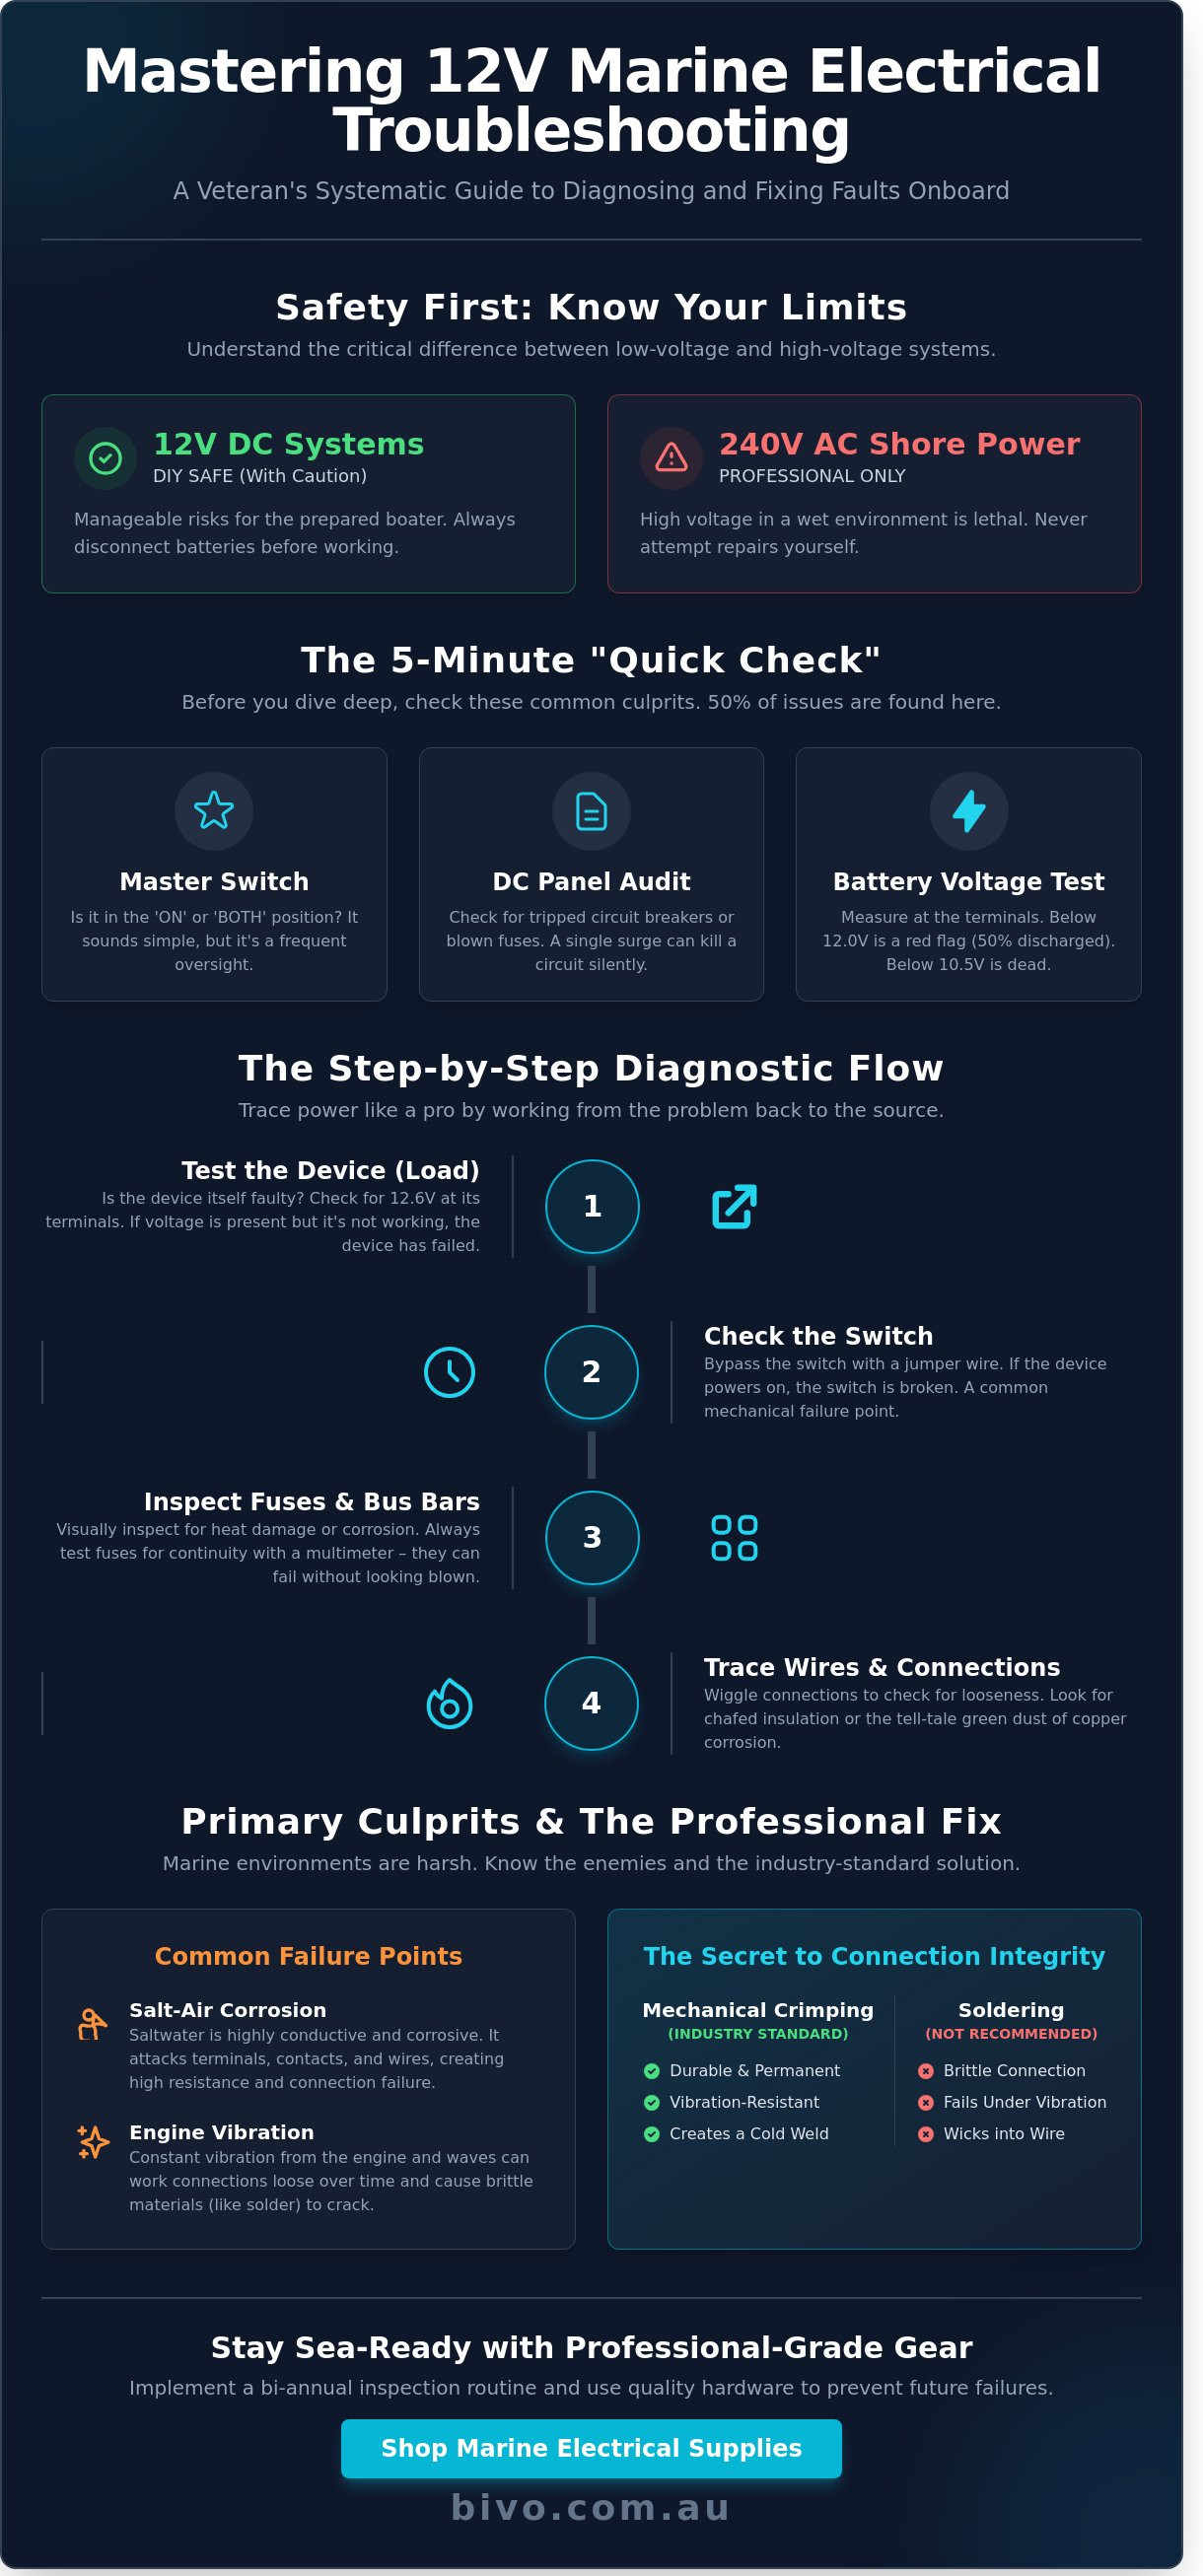
Focus your DIY efforts strictly on the 12V DC system. Never attempt to repair or modify 240V AC shore power systems yourself. High voltage in a wet environment is lethal. Professional certification is required for AC work for a reason. Stick to the low-voltage side where the risks are manageable but still require respect. Safety remains the priority. Keep your hands bone-dry and always disconnect the batteries before opening a distribution panel. These are non-negotiable rules for any seasoned veteran.
The "Reliable Veteran" rule is simple: 50% of all electrical problems are just bad switches or loose wires. Salt air is a relentless enemy that corrodes copper faster than you'd expect. Before you tear out a wiring harness, wiggle the connections. Understanding Boating electrical systems requires realizing that most faults are actually mechanical failures at a terminal point. A quick clean of a terminal post or tightening a nut often solves the issue without costing a cent.
The Essential Marine Troubleshooting Toolkit
Your digital multimeter is your most valuable crew member. Use it to verify continuity and pinpoint voltage drops across a circuit. For permanent, professional-grade repairs, a high-quality ratchet crimp tool is essential. Unlike cheap pliers, a ratchet tool ensures a consistent, high-pressure cold-weld connection that won't vibrate loose in heavy seas. You should also keep a dedicated circuit tester in your kit. It's the fastest way to perform ground checks and verify that power is reaching a light socket or pump motor.
The 5-Minute "Quick Check" List
Before diving into deep boat electrical system troubleshooting, run through these three basics. It's common to find the solution here:
- Master Battery Switch: Verify it's actually in the "ON" or "BOTH" position. It sounds obvious, but it happens to the best of us after a long winter.
- DC Panel Audit: Check for tripped breakers or blown fuses. A single surge can kill a circuit without visible damage to the wire.
- Voltage Test: Measure the battery at the terminals. Anything under 12.0V is a major red flag. A battery at 12.0V is effectively 50% discharged; at 10.5V, it's dead. Many marine electronics won't even boot up if they detect less than 11.5V at the input.
The Step-by-Step Diagnostic Flow: Tracing Power Like a Pro
Effective boat electrical system troubleshooting follows a logical path that saves time and prevents unnecessary rewiring. Don't start at the battery. Start at the device that isn't working. This method isolates the problem quickly. If your navigation lights fail, the issue is rarely the entire battery bank; it's usually a local fault at the bulb or the switch. We've used this "load-to-source" approach for 30 years to solve complex marine issues efficiently.
Testing the Load and Switches
Check the device first. A seized bilge pump motor often mimics a dead circuit. Use a multimeter to check for 12.6 volts at the device terminals. If power is present but the device is silent, the unit has failed internally. To test a suspected switch, use a jumper wire to bypass the toggle. Connect the input wire directly to the output wire. If the device springs to life, you have a failed switch. This simple test identifies mechanical failures in seconds. It's a reliable way to confirm if a component needs replacement or if the wiring is the culprit.
Tracing the Path: Fuses and Bus Bars
When the load has no power, work backwards to the nearest junction. Inspect your fuse holder box with negative bus for signs of heat or green corrosion. Marine environments are brutal on copper components. A fuse might look intact to the naked eye but still be blown; use a continuity tester to be certain. A fuse with high resistance can cause intermittent power loss that's hard to track down.
Reliability depends on clean connections. A high-quality marine bus bar provides a central point for distribution. If you see white powdery buildup on the terminals, conductivity drops significantly. Clean these contacts with a wire brush and apply a thin layer of dielectric grease. Following ABYC electrical standards ensures your wiring remains safe and compliant during these repairs. These standards help maintain the 10 percent maximum voltage drop allowed for general lighting and 3 percent for critical electronics.
The negative side of the circuit causes 80 percent of intermittent failures in marine systems. A loose ground wire creates "ghost power" or significant voltage drop. You might measure 12.6 volts when the device is off, but this drops to 4 volts the moment you flip the switch. This indicates high resistance in the circuit, usually caused by a corroded ground. We're here to help you find the right parts to fix these issues permanently. If you're struggling to find the source of the leak, our team of experts can guide you toward the right diagnostic tools.
Identifying Common Failure Points in Marine Electrics
Australian boaties deal with one of the harshest marine environments on earth. After 30 years in the industry, we've seen that most electrical failures stem from four predictable areas. Corrosion is the primary culprit. Salt air triggers "green death" on battery terminals and inside connectors. This oxidation creates high resistance, heat, and eventual circuit failure. You should inspect terminals every three months. Clean them with a wire brush and apply a dedicated terminal protector to keep the connection sealed.
Vibration is the second major factor. Unlike a car on a smooth road, a boat constantly slams against waves. This movement causes wires to chafe against bulkheads or engine blocks. We often see DIYers use automotive cable to save money. This is a mistake. Automotive wire lacks the fine stranding and tinning required for marine use. It's prone to internal fatigue and rapid corrosion. Adhering to U.S. Coast Guard electrical regulations or equivalent local standards ensures your wiring is thick enough to handle the current without overheating. Undersized wiring causes voltage drops that can starve your electronics of power.
Battery and Charging Issues
Effective boat electrical system troubleshooting starts at the source. If your battery dies overnight, you likely have a parasitic draw. This is a small, hidden load like a bilge pump float switch or stereo memory that stays active. Use your multimeter’s 10A setting to check for current flow when everything is "off." The alternator regulator is also a common fail point. If it doesn't sense battery voltage correctly, it won't charge the house bank. Modern rechargeable batteries Australia wide often require specific charging profiles. Lithium or AGM banks need higher precision than old lead-acid units to prevent permanent cell damage.
Poor Grounding and "Feedback" Loops
Electrical "feedback" is a classic sign of a bad ground. If your cabin lights dim when you key the VHF radio, you probably have a high-resistance ground connection. Marine systems rely on a common ground point for all DC loads. We recommend a central negative busbar rather than daisy-chaining wires. Shared negative returns cause flickering electronics because the current from one device interferes with another. This is common in older boats where new gear was added haphazardly over the years. Clean your ground points until the metal shines. It’s the fastest way to fix 60% of ghost issues in your boat electrical system troubleshooting process.
- Check for Green Death: Look for blue-green crust on terminals and wire ends.
- Verify Cable Gauge: Ensure wire thickness matches the length of the run and the amp load.
- Secure Loose Wiring: Use cable ties every 200mm to prevent vibration damage.
- Test the Regulator: Ensure your alternator puts out 13.8V to 14.4V while the engine is running.
Permanent Fixes: The Secret to Connection Integrity
Temporary fixes don't last on the water. After 30 years in the industry, we've seen that 85% of electrical failures stem from poor connection choices. When performing boat electrical system troubleshooting, the debate between crimping and soldering often arises. While soldering is common in automotive work, the American Boat and Yacht Council (ABYC) prefers mechanical crimps for marine environments. Soldering creates a hard spot where the solder wicks into the stranded wire. Under the constant vibration of a hull at sea, this creates "brittle failure" where the wire snaps at the end of the solder joint.
Salt air is the enemy of every connection. It wicks moisture into non-sealed joints, leading to internal corrosion that you can't see until the circuit fails. In the harsh Australian marine environment, tinned copper wire is mandatory. Bare copper oxidizes rapidly when exposed to salt spray, while tinned strands resist the "green rot" that destroys conductivity. Always verify your work with a "Pull Test." Give every new connection a firm, three-second tug. If the wire moves or slides out of the barrel, the connection is faulty and will eventually fail under load.
Using Heat Shrink Connectors Correctly
To ensure a permanent fix, use heat shrink crimp joiners to link cables. Start by stripping 8mm of insulation without nicking the copper strands. Insert the wire into the barrel and use a ratcheting tool to apply consistent pressure. Once crimped, use a heat gun to shrink the outer sleeve until the internal adhesive flows. Environmental sealing is the barrier against salt-air electrolysis. For custom looms, slide a length of adhesive-lined heat shrink tubing over the joint to provide a secondary waterproof layer.
Professional Crimping Techniques
Selecting the right hardware is the first step toward a professional result. Match your heat shrink ring terminal to the exact stud size on your busbar or battery switch. Avoid the "crush" trap common with cheap, flat-blade pliers found in hardware stores. These tools flatten the terminal barrel rather than compressing it into a hexagonal or nesting shape. A proper crimp ensures the wire insulation is caught correctly in the terminal barrel, providing strain relief that prevents the strands from flexing and breaking at the contact point.
We're here to help you get the job done right the first time. Explore our full range of marine electrical components to secure your boat's reliability.
Preventing Future Failures with Quality Marine Hardware
Effective boat electrical system troubleshooting often reveals that most faults start with small, avoidable issues. Salt air, constant vibration, and moisture are relentless. To keep your vessel operational, you must move beyond reactive repairs and adopt a preventative maintenance schedule. High-quality hardware and disciplined habits are the best defense against a dead battery or a failed bilge pump when you're miles from the ramp.
Perform a "tug and visual" inspection of all bilge wiring every six months. Physically pull on each connection. If a wire moves within its crimp or a terminal feels loose, it's a failure waiting to happen. Vibration from the engine or heavy chop can back out screws and loosen nuts over time. While you're there, apply a thin layer of lanolin or dielectric grease to all exposed battery terminals. This simple step blocks oxygen and moisture, preventing the green oxidation that chokes voltage flow.
Organization is just as vital as hardware quality. Label every wire at both ends using heat-shrink labels or waterproof tags. Spending 10 minutes labeling a new fishfinder install today saves 10 hours of frustrating circuit tracing in the future. You should also standardize your hardware. Using the same gauge of wire and the same style of connectors across your secondary systems simplifies your spares kit and ensures you always have the right part on hand.
Building a Marine Spares Kit
Every boat needs a dedicated electrical emergency kit. You should carry at least 50 heat shrink solder connectors in a mix of sizes. These connectors create a waterproof, soldered bond that resists vibration better than standard automotive crimps. Keep a small length of double braid polyester marine rope in your kit as well. It's perfect for lashing down loose wire looms or securing battery boxes that have shaken free. Don't forget a complete set of spare fuses and a basic 12V circuit tester to verify power at the source.
The Bivo Advantage: 30 Years of Marine Expertise
Reliability isn't a luxury on the water; it's a necessity. At Bivo, we've spent 30 years in the industry identifying which components withstand the Australian marine environment. We source only trade-quality marine electrical supplies Australia wide to ensure your boat stays out of the repair shop. Our Sydney warehouse offers fast and free delivery across the country, getting professional-grade parts to your door without delay. We're here to help you maintain a safe and dependable vessel. Shop Bivo’s professional marine electrical range here.
Master Your Marine Maintenance Today
Effective boat electrical system troubleshooting requires a logical diagnostic flow and the right hardware. You now have the veteran's approach to tracing power and identifying common failure points before they leave you stranded. Success on the water depends on the integrity of your connections. Don't settle for substandard parts that corrode after one season. Bivo brings 30+ years of Australian marine industry experience to every project. We provide trade-quality hardware at retail value. This ensures your repairs last as long as your boat. We're here to help you get back on the water quickly. With Fast & Free Delivery Australia Wide, you'll have the gear you need without the wait. Our team understands the harsh demands of the Australian environment. We've spent three decades sourcing components that withstand salt and vibration. Take control of your vessel's reliability and keep your systems running safely.
Upgrade your toolkit with Bivo’s professional marine electrical supplies
You've got the knowledge and the plan. Now go out and make your electrical system bulletproof.
Frequently Asked Questions
How do I know if my boat battery is actually dead or just discharged?
Check the voltage with a multimeter after it's been on a charger for 24 hours. A healthy, fully charged 12V lead-acid battery should read 12.6V to 12.7V. If the reading stays below 10.5V after charging, it likely has a dead cell. We've seen this in 90% of batteries over 4 years old.
Can I use standard automotive wire for my boat electrical repairs?
No, you must use marine-grade tinned copper wire to prevent corrosion and vibration failure. Standard automotive wire uses bare copper that oxidizes quickly in salt air. Marine wire meets UL 1426 standards and features individual tin plating on every strand. This is a critical step in professional boat electrical system troubleshooting to ensure long-term reliability and safety.
What is the most common cause of a bilge pump not working?
A stuck float switch or debris in the impeller is the most frequent culprit. Roughly 60% of pump failures result from hair, fishing line, or wood chips jamming the mechanism. Check the fuse first, then clear the intake. If the motor hums but doesn't pump, the impeller is likely blocked by solid waste or scale buildup.
Is it better to solder or crimp wires on a boat?
High-quality crimping is the industry standard for marine environments. Soldering creates a rigid wicking point that snaps under the constant 5G vibrations a boat experiences at sea. Use heat-shrink butt connectors with a ratcheting crimper for the best results. This method provides a mechanical bond that lasts 10 times longer than solder in harsh offshore conditions.
How do I use a multimeter to check for a blown fuse?
Set your multimeter to the continuity setting or the lowest ohms scale. Touch the probes to both sides of the fuse while it's removed from the holder. A reading of 0.1 to 0.5 ohms means the fuse is good. If the meter shows OL or infinity, the internal element is broken and requires an immediate replacement to restore the circuit.
What should I do if my electronics keep "blinking out" when I start the engine?
This indicates a voltage drop caused by high resistance or a weak starting battery. The starter motor can pull 200 to 400 amps, leaving insufficient power for sensitive GPS units. Clean your terminal connections with a wire brush to ensure a solid contact. If the issue persists, consider installing a dedicated house battery or a voltage stabilizer to protect your gear.
How often should I inspect my boat’s electrical system for corrosion?
Perform a full visual inspection every 6 months or 100 engine hours. Focus on the battery terminals, bus bars, and bilge connections where moisture is highest. Our 30 years of experience shows that early detection of salt crust can save you from a $500 rewiring job later. We're here to help you identify the right protective sprays for your setup.
Why does my boat have "green" corrosion on the copper wires?
That green powder is acetic acid or salt reacting with the copper, known as green plague. It occurs when moisture penetrates the wire insulation, often through unsealed ends. This corrosion increases resistance and can stop current flow entirely. Replacing affected sections with tinned copper is the only permanent fix when performing boat electrical system troubleshooting to restore your power.