

You have finally reached the boat ramp at 4:30 AM on a Saturday, only to find your indicator lights flickering or completely dead. It's a frustrating scenario that ruins a fishing trip before it even starts. Most boat owners agree that electrical gremlins are the single biggest headache when towing. Saltwater ingress can destroy standard connections in under six months, and the confusion between 7-pin flat and round plugs often leads to expensive blown fuses in your tow vehicle. This guide provides the most accurate boat trailer wiring diagram Australia requires for 2026, ensuring you don't risk your vehicle's electronics on a guess.
We're here to help you get it right the first time. You'll master the Australian standard colour codes and learn the marine-grade installation techniques we've refined over 30 years in the industry. We've seen every mistake in the book, from poor earthing to incorrect pinouts that fail at the first inspection. This article covers clear diagrams for every common plug type and professional tips to build a system that passes rego and resists saltwater corrosion for years to come. It's about providing the quality and value for money you need to get back on the water with confidence.
Key Takeaways
- Ensure road compliance by mastering the AS4177.5-2004 standards specific to Australian boat trailers.
- Use our expert boat trailer wiring diagram Australia to accurately map 7-pin flat and round connectors for a reliable connection.
- Learn why marine-grade components are vital to stop saltwater corrosion from traveling up your wiring insulation.
- Identify and fix common lighting issues like the "bad earth" syndrome with a professional, systematic approach.
- Equip yourself with the right professional tools to achieve a secure, trade-quality rewire that lasts for years.
Understanding the Australian Trailer Wiring Standards
Reliability on the boat ramp starts with correct electrical standards. In Australia, the AS4177.5-2004 standard dictates the requirements for caravan and light trailer towing components. This isn't just a suggestion; it's the foundation for road compliance across all states. Bivo has 30 years of experience in the marine sector. We've seen how salt water destroys substandard electrical systems in months. Boat trailers require higher-spec components than standard box trailers because they're regularly submerged in corrosive environments.
By 2026, LED lighting is the mandatory benchmark for marine trailers. Unlike old incandescent bulbs, LED units are hermetically sealed to prevent water ingress. This shift has changed how a boat trailer wiring diagram Australia is structured. Modern diagrams prioritize waterproof connectors and tinned copper wiring to combat "wicking," where salt water travels up inside the wire insulation. Investing in quality parts now prevents expensive rewiring jobs later. Our goal is to make your time on the water pleasant and trouble-free.
Standard Plug Types in Australia
Australia uses a specific set of connectors that differ from some overseas markets. While technical details often align with ISO trailer connector standards, you must ensure your plug matches your vehicle's socket. The 7-pin flat plug is the most common choice for modern SUVs and utes. It's compact and provides a secure connection for standard lighting functions. 7-pin round plugs come in small and large sizes; the small round is frequent on older vehicles, while the large round is built for heavy-duty commercial setups.
If your trailer has high-power requirements, the 12-pin flat plug is the solution. It features the standard 7-pin configuration on top with an additional row of five larger pins below. These extra pins handle heavy-duty tasks like powering electric winches or charging onboard boat batteries while you drive. We're here to help you choose the right fit for your rig. Using the correct plug ensures a stable connection every time you hit the road.
ADR Compliance and Safety Requirements
Australian Design Rules (ADR) set the legal requirements for trailer lighting. Every trailer on Australian roads must have functional indicators, brake lights, and tail lights. Using "cheap" non-compliant plugs is a risk. These components often fail to maintain a steady connection, which can lead to hefty fines or insurance complications after an accident. Compliance ensures your trailer is visible and predictable to other drivers. It's a small price to pay for peace of mind.
The ground wire, or earth wire, is the backbone of your entire circuit. Most trailer lighting failures stem from a poor ground connection. In a marine environment, a dedicated earth wire to every light is better than relying on the trailer frame. This prevents circuit failure caused by rust or paint interference. Our 30 years in the industry prove that a robust earth is the best defense against flickering lights. We provide the expertise you need for a safe, legal tow. Fast & Free Delivery Australia Wide ensures you get these essential components quickly.
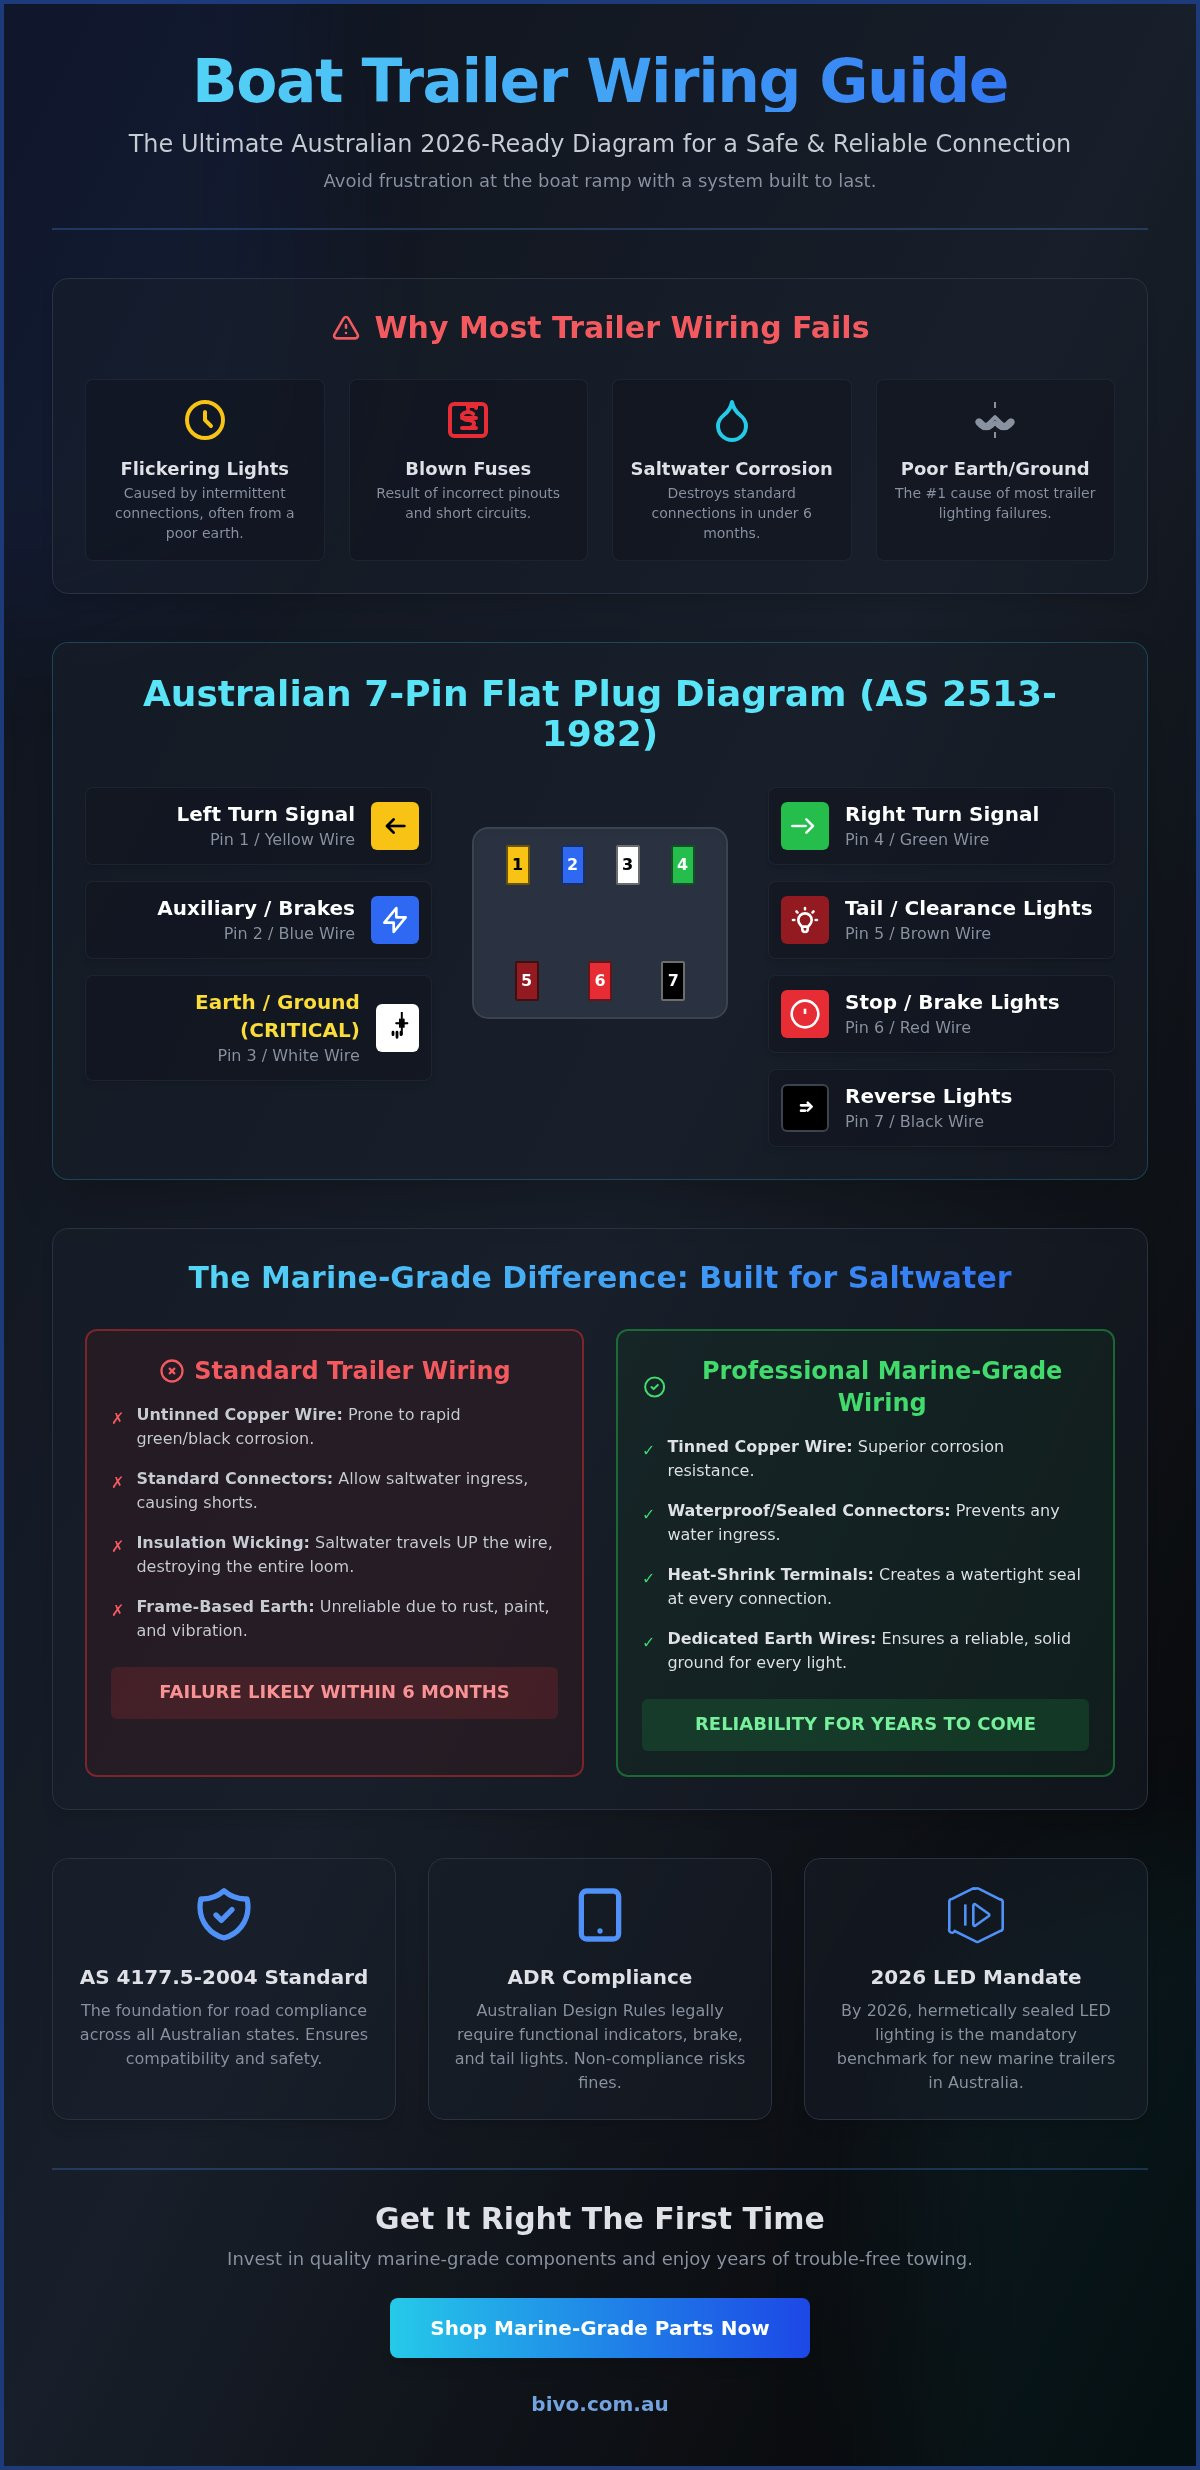
The 7-Pin Boat Trailer Wiring Diagram and Colour Codes
Australian boat trailers rely on a standardized electrical system to ensure safety between the tow vehicle and the trailer. Most modern setups use either a 7-pin flat or a 7-pin round connector. Understanding the boat trailer wiring diagram Australia standard is the first step to a successful DIY install or repair. At Bivo, we've spent 30 years in the industry helping boaties get their rigs road-ready. We know that a single loose wire can lead to a fine or, worse, an accident on the highway.
The 7-Pin Colour Code Breakdown
The Australian standard (AS 2513-1982) dictates specific colours for each function. Stick to these codes to ensure any mechanic or future owner can troubleshoot the system easily. Here is the mapping for a standard 7-pin plug:
- Pin 1 (Yellow): Left-hand turn signal.
- Pin 2 (Blue): Auxiliary or electric brakes. In some older boats, this might be used for an internal cabin light.
- Pin 3 (White): Earth/Ground connection. This is the most critical wire. If your lights flicker or don't work, check this connection first.
- Pin 4 (Green): Right-hand turn signal.
- Pin 5 (Brown): Tail lights, clearance lights, and the number plate lamp.
- Pin 6 (Red): Stop/Brake lights.
- Pin 7 (Black): Reversing lights. Not all trailers have these, but the pin remains reserved for this purpose.
When you're looking at the connector, you must distinguish between the "wire side" and the "mating side." The wire side is where you physically screw the copper strands into the terminals. The mating side is the face that plugs into the car. Most diagrams show the mating side. If you wire it from the back without accounting for this flip, you'll mirror the entire layout. This is why many people accidentally swap the left and right indicators. Always double-check your orientation before tightening those terminal screws.
12-Pin Flat Extension Diagram
If your boat trailer is heavy enough to require high-current appliances or sophisticated electric-over-hydraulic braking systems, you'll likely use a 12-pin flat plug. This connector features the standard 7 pins in a top row, with 5 larger pins (8 through 12) located underneath. These additional pins are designed to handle up to 35 Amps each, compared to the 15 Amp limit of the smaller pins.
Pin 8 (Orange) and Pin 9 (Pink) are typically used for battery feeds and auxiliaries. Pin 10 (White) serves as a heavy-duty earth to manage the increased current. You must use the correct wire gauge for these pins. We recommend a minimum of 6mm automotive wire for pins 8 through 12 to prevent voltage drop over the length of the trailer. If you're setting up a new system, it's a good idea to browse our range of marine electrical components to ensure you have the right heavy-duty connectors for the job. We're here to help you get the right parts fast with free delivery Australia wide.
Properly integrating an electric brake controller with the 12-pin standard ensures your braking force is consistent. Remember that saltwater is a conductor. Even with a perfect boat trailer wiring diagram Australia setup, you should use tinned copper wire to prevent "green rot" corrosion from climbing up your harness. It's a small investment that protects your electrical system for years to come.
Marine-Grade Wiring: Protecting Against Saltwater Corrosion
Standard automotive wiring often fails within 12 months in Australian saltwater conditions. It isn't built for the constant immersion seen at local boat ramps. At Bivo, we've seen countless trailers suffering from "green rot" because the owner used standard bare copper wire. Saltwater is aggressive. It doesn't just sit on the surface; it travels up inside the insulation through capillary action. This wicking effect can ruin an entire 7-core harness in a single season, turning flexible wire into a brittle, non-conductive mess.
To avoid frequent repairs, always choose tinned copper wire. Each individual strand is coated in a thin layer of tin to prevent the copper from oxidizing when it meets salt air and moisture. This is the industry standard for any reliable boat trailer wiring diagram Australia. We advocate for the "Bivo Method," which focuses on 100% waterproof electrical joins rather than quick, cheap fixes that lead to failure at the ramp.
Heat Shrink and Solder: The Professional Choice
Never use "twist and tape" methods or plastic screw terminals on a boat trailer. These methods invite moisture and vibration-induced failure. For a permanent, professional join, we recommend using heat shrink solder connectors. These specialized sleeves melt solder onto the join while shrinking the outer layer simultaneously. Always use dual-wall adhesive-lined heat shrink. As the tubing cools, the internal glue creates an airtight, waterproof seal that protects the connection from the harsh Australian sun and salt.
Cable Routing and Mechanical Protection
Properly securing your cables is just as important as the wire quality. Secure all wiring inside the trailer frame whenever possible. This protects the insulation from UV damage and prevents the harness from snagging on submerged debris or the trailer itself. Use rubber grommets and corrugated conduit at every entry and exit point to stop the metal frame from chaffing the wires. Finally, apply a liberal coating of dielectric grease to your 7-pin or 12-pin plug. This simple step protects the brass interface from corrosion and ensures your boat trailer wiring diagram Australia works the first time, every time you hit the water. With 30 years in the industry, we know these small details save you hours of frustration later.
Troubleshooting Common Boat Trailer Light Issues
Electrical faults usually happen at the worst time, often at a dark boat ramp after a long day on the water. Effective troubleshooting starts with isolation. You must determine if the fault lies with the vehicle or the trailer. Use a digital multimeter rather than a basic test light. While a test light shows if power is present, a multimeter reveals the quality of that power. A reading of 12.6V indicates a healthy circuit, while a reading of 9V suggests high resistance or a failing connection that a simple bulb might not catch.
The "Bad Earth" syndrome causes 85% of trailer lighting failures in Australia. Saltwater accelerates corrosion at the grounding point, leading to symptoms like dim lights or indicators that flash when you apply the brakes. Don't rely on the tow ball for grounding. This creates an intermittent connection. Instead, run a dedicated white earth wire from the plug to each light unit. Secure these connections with heat-shrink terminals to lock out moisture. Our 30 years of experience in the marine industry shows that a hard-wired earth is the only way to ensure long-term reliability.
Step-by-Step Fault Finding
Start at the vehicle socket. Use your multimeter to verify that every pin matches your boat trailer wiring diagram Australia. If the car side is dead, check the internal fuses, usually located in the boot or under the dashboard. If the car is fine, inspect the trailer plug pins. Use fine sandpaper or a dedicated contact cleaner to remove the green oxidation that builds up on brass terminals. Follow the cable along the trailer chassis to look for crushed or pinched wires. These often occur near the tilt mechanism or where the cable enters the box section. Since 2022, we've seen an increase in wire fatigue on trailers that don't use proper grommets at entry points.
Modern Vehicle Interface Issues
Modern European SUVs and late-model Australian utes use CANbus systems that monitor current draw. Because LED lights draw 90% less current than traditional bulbs, the vehicle may think a bulb is blown. This results in "hyper-flashing" or flickering. You'll likely need a "Load Box" or a set of resistors to simulate the draw of a standard bulb. For imported trailers from the US or Europe, you might encounter 12V to 24V conversion issues. Most Australian vehicles operate on 12V, so ensure your LED modules are multi-voltage rated (10V-30V) to avoid burning out the diodes. If your vehicle has sensitive smart sensors, installing a dedicated wiring loom with a fused power supply directly from the battery is the safest path.
If you're struggling with a flickering system or need high-quality components for a rewire, view our range of marine-grade electrical supplies to get your trailer back on the road safely.
Essential Tools for a Professional Trailer Rewire
Having the right tools determines whether your trailer lights last ten years or fail at the boat ramp next weekend. Successfully following a boat trailer wiring diagram Australia requires more than basic household tools. You need professional equipment designed to combat the corrosive effects of salt air and constant submersion.
A ratchet crimp tool is your most vital investment. Cheap pliers don't apply even pressure, which creates tiny air gaps inside the terminal. These gaps allow salt spray to penetrate the connection, leading to rapid oxidation and light failure. Ratchet tools ensure the crimp is fully compressed before the jaws release. Use dedicated wire strippers rather than a pocket knife. Knives often nick the internal copper strands. A single nicked strand reduces the wire's current-carrying capacity and creates a structural weak point where corrosion will thrive.
For insulation, skip the cigarette lighter. Lighters produce soot and uneven heat that can char the wire casing before the tubing actually shrinks. A high-quality heat gun or a portable butane torch provides the controlled, 360-degree heat needed for a consistent, watertight seal. This is the difference between a temporary fix and a professional rewire.
The Bivo Marine Electrical Toolkit
Our 30 years of experience in the Australian marine industry confirms that heat shrink crimp joiners are the gold standard. These connectors feature an internal adhesive lining. When heated, the glue melts and flows into the wire strands to create a permanent, waterproof barrier. Standard plastic connectors simply won't survive the Australian coast.
Every boatie should carry a "Spares Kit" for emergency ramp-side repairs. This kit should include:
- Assorted heat shrink joiners and ring terminals
- A portable butane torch with a safety lock
- A spare 7-pin or 12-pin trailer plug
- Small rolls of tinned marine-grade cable
Why Quality Hardware Matters
Cheap hardware is a false economy in a saltwater environment. Components that aren't tinned or properly sealed will fail quickly, often causing blown fuses or damaged vehicle electronics. Bivo focuses on value-for-money by providing hardware that actually withstands the Australian climate. We support trade and wholesale partners with bulk electrical supplies, ensuring professionals have access to the same gear we've trusted for three decades.
We ship directly from our Sydney warehouse to ensure your parts arrive before your next trip. Most orders are processed within 24 hours because we know trailer repairs are usually urgent. Fast & Free Delivery Australia Wide means you can get the right parts for your boat trailer wiring diagram Australia project without the wait. We're here to help you get back on the water safely.
Secure Your Connection on Australian Roads
Mastering your boat trailer wiring diagram Australia ensures your vessel stays safe and legal during every launch. Following the correct 7-pin colour codes prevents electrical faults that often lead to avoidable fines or road accidents. Protecting your system with marine-grade components is essential because saltwater corrosion can degrade standard copper wiring in less than 12 months. Bivo brings 30 years of industry experience to every product we stock. We provide the professional trade-quality hardware needed to withstand harsh coastal environments. Don't risk a lighting failure at the boat ramp when you can install components built specifically for Australian conditions. Our team values your time and safety above all else. We've spent three decades acting as a safe pair of hands for the local marine community. You can rely on our expertise to keep your trailer lights bright and your wiring reliable for the long haul.
Ready to upgrade your setup? Shop our range of Marine Electrical Supplies and get Fast & Free Delivery Australia Wide. We're here to help you get back on the water with confidence.
Frequently Asked Questions
Is the boat trailer wiring colour code the same for all Australian states?
Yes, the boat trailer wiring colour code is standardized across all Australian states under Australian Standard AS 2513-1982. This ensures consistency whether you're in Queensland or Western Australia. Following a standard boat trailer wiring diagram Australia provides helps prevent dangerous cross-wiring mistakes. Yellow is always for the left-hand turn signal, green for the right-hand turn, and white is used for the earth connection.
Can I use a 7-pin flat plug on a vehicle with a 7-pin round socket?
You can't plug a 7-pin flat plug directly into a 7-pin round socket because the pin configurations and housing shapes don't match. You must use a 7-pin flat to 7-pin round adapter to bridge the connection. These adapters are available for approximately A$15 to A$25 at most marine electrical retailers. Always check that the adapter pins are clean to maintain a solid electrical connection while towing.
Why do my trailer lights blink fast when I use my indicators?
Fast blinking usually indicates a low current draw, which is common when you switch from traditional halogen bulbs to LEDs. Modern vehicle flasher units detect the lower resistance of LEDs and assume a bulb has failed. To fix this, install a load resistor or an LED-compatible flasher relay. This restores the flash rate to the standard 60 to 120 pulses per minute required by Australian Design Rules.
Should I solder or crimp my boat trailer wire connections?
Use high-quality crimp connectors with adhesive-lined heat shrink for marine environments. Soldered joints are rigid and prone to work hardening, which causes them to snap under the constant vibration of Australian roads. A proper crimp remains flexible and durable. After crimping, use a heat gun to seal the tubing, creating a 100% waterproof barrier against saltwater ingress and corrosion.
What is the best way to prevent my trailer plug from rusting?
Apply a liberal amount of dielectric grease or lanolin-based spray to the plug terminals to block moisture and salt. This simple maintenance step can extend the life of your connectors by 3 to 5 years. Always store the trailer plug in a dedicated holder or dummy socket when it's not in use. This keeps the terminals off the ground and away from wet grass, mud, or puddles.
Why does my car say "Trailer Disconnected" when the lights are clearly on?
This error occurs because modern CAN bus systems don't detect the low power draw of LED trailer lights. The vehicle's computer assumes nothing is plugged into the socket. You can resolve this by fitting an LED load box or a pulse width modulation filter. These devices simulate the load of traditional bulbs, ensuring the vehicle's safety systems recognize the trailer is attached and function correctly.
Do I need a separate battery on the trailer for electric brakes?
You need a dedicated battery on the trailer if it has a Gross Trailer Mass over 2,000kg. This powers the breakaway system required by law in all Australian states. The system must be capable of holding the brakes on for at least 15 minutes if the trailer detaches from the vehicle. For trailers under 2,000kg with electric brakes, the power is typically drawn directly from the towing vehicle's battery.
How much wire do I need for a standard 5-metre boat trailer?
A standard 5-metre boat trailer typically requires 15 to 18 metres of 5-core or 7-core trailer cable. This covers the length of the frame, the drawbar, and the internal wiring for the lights. Always allow an extra 1.5 metres of slack at the hitch to prevent the cable from tensioning during tight turns. Using a pre-made boat trailer wiring diagram Australia ensures you don't miss the extra metre needed for cross-member runs.