

That perfectly smooth, soldered joint you just finished might be the exact point where your navigation system fails ten nautical miles off the Australian coast. While a soldered connection looks solid, the constant vibration of a hull hitting chop often turns that rigid bond into a brittle failure point. We know the stakes are high. You've invested thousands in marine electronics and the last thing you need is a "green death" corrosion issue or a total power loss while offshore.
After 30 years in the marine industry, we've seen how the soldering vs crimping marine wires debate often leads to costly mistakes. Most boaties want a connection that lasts, but the industry standard is clear. This guide explains why professional electricians choose mechanical crimping over solder to meet ABYC E-11 safety standards. We'll show you the exact tools and tinned-copper terminals required to keep your boat's electrical system corrosion-free and reliable for years to come.
Key Takeaways
- Understand why constant hull vibration makes rigid soldered joints a liability compared to the flexible strength of professional crimping.
- Learn how "wicking" creates brittle hard spots in your wiring, leading to fatigue and electrical failure in harsh offshore conditions.
- Master the debate of soldering vs crimping marine wires by discovering why high-pressure cold-welds are the industry standard for 2026.
- Identify the essential tools and techniques, such as using ratchet crimpers, to ensure your terminals meet trade-quality standards every time.
- Discover how to build a bulletproof electrical system using heat-shrink protection to safeguard your boat’s investment against Australia’s salt-air environment.
The Great Debate: Why Marine Wiring is Different from Home Electronics
Boat owners often ask if they can use standard automotive or home electrical techniques on their vessels. The short answer is no. A house stays stationary; a boat is a vibrating, pounding platform submerged in a corrosive salt environment. After 30 years in the industry, we've seen how quickly sub-standard joins fail at sea. Deciding between soldering vs crimping marine wires requires an understanding of how these two methods handle the harsh Australian coastline conditions.
The American Boat and Yacht Council (ABYC) E-11 standards provide the blueprint for safe offshore power. These regulations dictate that solder cannot be the sole source of mechanical strength in a connection. This rule exists because solder creates a rigid "hard spot" in the wire. Marine Grade wire uses tinned copper strands to prevent "black wire" corrosion. When you solder these strands, the stiff section eventually snaps under the weight of hull vibration. Our experience shows that mechanical reliability is just as vital as electrical flow.
The Three Enemies of Boat Wiring
- Saltwater corrosion: Salt air and spray act as electrolytes. They trigger electrolysis that eats copper from the inside out if the join isn't perfectly sealed.
- Mechanical stress: Engine harmonics and 25-knot impacts against heavy chop create constant fatigue. Rigid joins fail where flexible ones survive.
- Temperature fluctuations: Engine bays often reach 60 degrees Celsius while bilges remain cold and damp. This cycle of expansion and contraction ruins weak joins over time.
Electrical Conductivity vs. Mechanical Reliability
A join might show 0.0 ohms on a multimeter, but that doesn't mean it's seaworthy. Solder offers excellent conductivity through chemical bonding. However, it lacks the flexibility needed for a boat in a seaway. A high-quality gas-tight crimped connection is the preferred industry standard because it deforms the terminal and wire into a single solid mass. This process excludes oxygen and moisture while maintaining the structural integrity of the cable. We've found that trade professionals prefer this method for its speed and consistency. A marine-grade connection is one that balances flexibility with airtight sealing.
Understanding the soldering vs crimping marine wires debate is the first step toward a reliable 12V system. We're here to help you select the right components for your next project. Our team values your time and money, ensuring you get the quality parts needed for a safe journey. Whether you are a weekend fisher or a commercial operator, getting your wiring right prevents costly breakdowns offshore.
The Case Against Soldering: Understanding "Wicking" and Brittleness
Many boaties assume a soldered joint is the gold standard for strength. Our 30 years of experience in the Australian marine industry tells a different story. The debate of soldering vs crimping marine wires often ends when you look at the physics of "wicking." When you apply heat and solder to multi-strand wire, the liquid metal travels up the strands under the insulation through capillary action. This process turns a flexible cable into a rigid, solid rod.
This rigidity is a major failure point. Even the NASA workmanship standards prioritise crimping over soldering for connections subject to high vibration. If it's not reliable enough for a spacecraft, it's a risk on a twin-engine offshore fisher. Marine-grade wire uses tinned copper to fight corrosion. High heat from a soldering iron can degrade this protective layer or create "cold joints" if the tinning doesn't flow correctly. In the humid, salt-heavy air of the Gold Coast or Sydney Harbour, a cold joint will fail within months.
The Problem with Wicking
Wicking creates a "hard spot" exactly where the solder stops. This creates a sharp transition zone. On a moving vessel, all the mechanical stress concentrates at this specific point. The wire doesn't just bend; it fatigues and snaps. If you don't clean flux residue perfectly, the chemicals trapped under the insulation will eat the copper from the inside out. It's a hidden threat that leads to total electrical failure at sea.
Vibration: The Silent Killer of Solder Joins
Vibration is constant on any boat. Outboard motors and bilge pumps generate specific frequencies that are brutal on rigid bonds. We've seen solder joints in outboard harnesses develop microscopic cracks after just 200 hours of engine time. These cracks increase resistance, generate heat, and eventually kill the circuit. Crimping provides a mechanical bond with enough "give" to handle these vibrations. It's why we recommend professional-grade marine electrical supplies that favour crimped connections for long-term reliability. When evaluating soldering vs crimping marine wires for your next refit, remember that flexibility equals longevity.
- Solder turns flexible wire into a brittle rod.
- Stress concentrates at the end of the "wicked" solder.
- Flux residue accelerates internal corrosion.
- Engine vibration causes rigid joints to crack.
Why Crimping is the Marine Industry Standard
Crimping is the preferred method for 95% of professional marine electrical installations. It's built on the principle of the "cold weld," where mechanical pressure deforms the metal to create a gas-tight join. This connection is physically stronger than the wire itself. When debating soldering vs crimping marine wires, professionals choose crimping because it handles the relentless vibration of a boat hull far better than a rigid soldered joint. It's about durability in a harsh environment.
- Mechanical Strength: A proper crimp creates a molecular bond that won't pull apart under tension.
- Vibration Resistance: Crimped joins remain flexible, preventing the wire from snapping at the connection point.
- Speed: You can complete a crimp in seconds, making it the only viable choice for large-scale rewiring projects.
Consistency is king on the water. A quality ratcheting tool ensures every terminal receives the same pressure, whereas soldering quality fluctuates with wind, temperature, and technician skill. For a reliable seal, you can't skip the adhesive-lined heat shrink. This adds a layer of waterproof protection and structural support that prevents the wire from flexing at the terminal entrance. We've seen 30 years of boat wiring failures, and the lack of proper heat shrink is usually the culprit.
The Anatomy of a Perfect Marine Crimp
A perfect crimp starts with the right materials. You must use tinned copper terminals. Untinned copper oxidises rapidly in salt air, leading to high resistance and heat. The "cold weld" achieved during the crimping process excludes oxygen from the contact area, effectively stopping galvanic corrosion before it starts. For those following Marine Electrical Supplies Australia standards, using the correct gauge wire and a matched terminal is non-negotiable for long-term reliability. Don't settle for cheap automotive terminals that aren't rated for the ocean.
The Hybrid Solution: Heat Shrink Solder Connectors
While standard crimping is the go-to, Bivo offers a hybrid solution for specific repairs. Our heat shrink solder connectors combine a low-temperature solder ring with an adhesive-lined waterproof sleeve. These are excellent for low-profile joins in tight spaces where a traditional crimp tool won't fit. They solve the common "wicking" problem by providing built-in strain relief that moves the flex point away from the solder. We recommend the 100-piece mixed pack for DIY boat owners. It's a cost-effective way to keep your vessel's electrical system shipshape without needing a workshop full of specialised heavy-duty tools. We're here to help you get the job done right the first time.
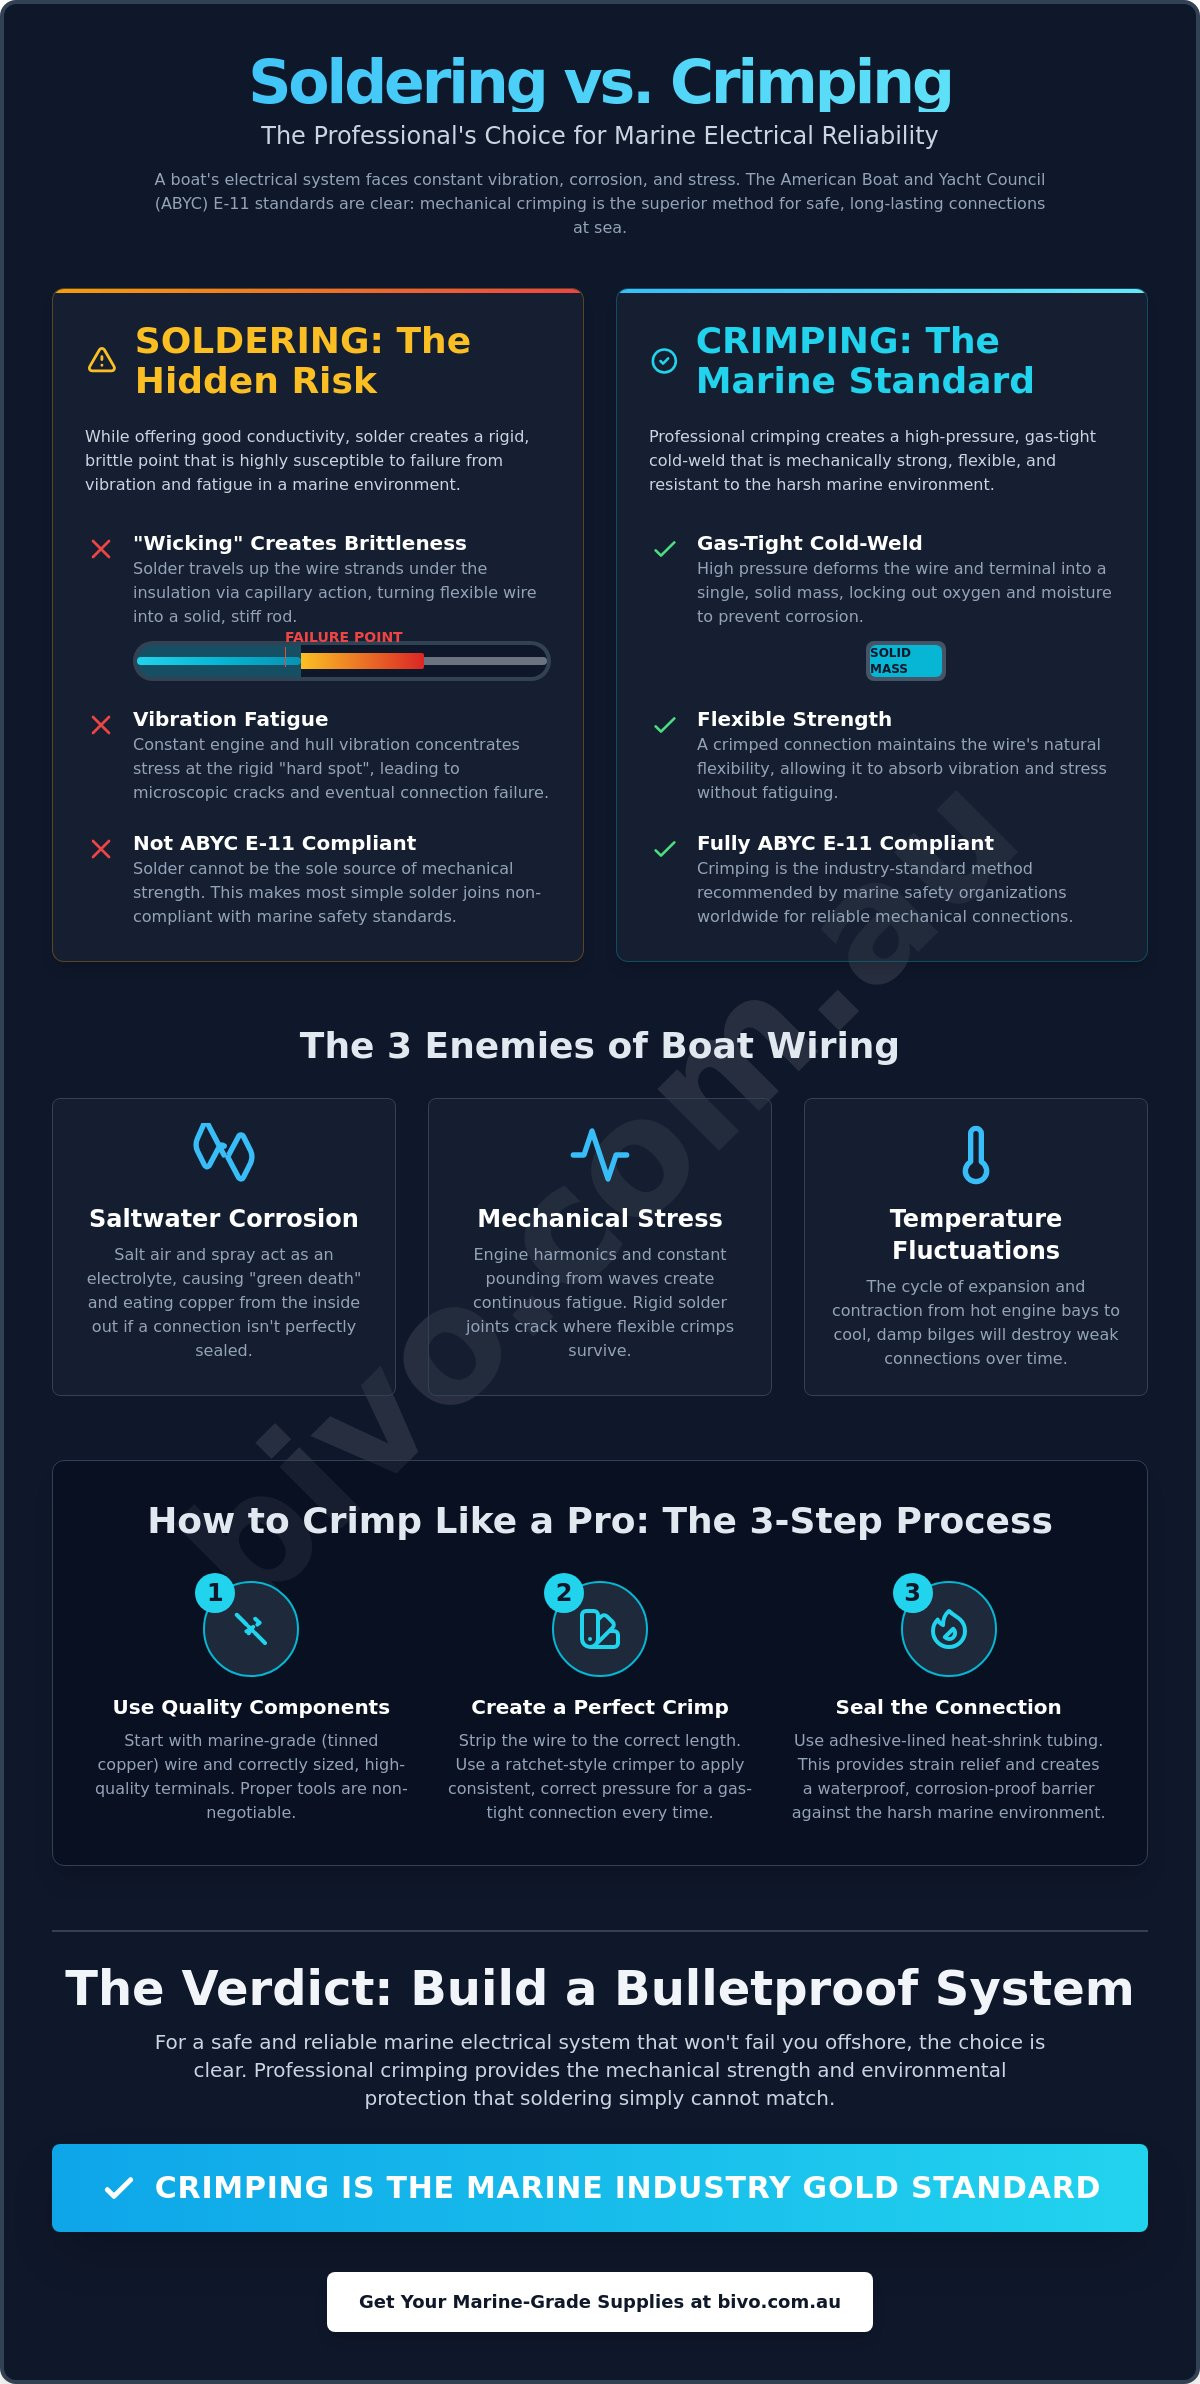
How to Crimp Like a Pro: Tools and Techniques
Achieving a reliable connection starts with the right equipment. Many boat owners make the mistake of using cheap, $15 automotive "crush" pliers found at general hardware stores. These tools apply uneven pressure and often result in a connection that fails under vibration. In the debate of soldering vs crimping marine wires, the quality of your crimp tool is the deciding factor in longevity. Professional ratchet tools are the industry standard because they don't release until the specific compression cycle is complete. This ensures every join is identical and mechanically sound.
Choosing the Right Crimp Tool
A high-quality ratchet tool eliminates human error. It uses a calibrated mechanism to apply the exact force needed to cold-weld the terminal to the wire strands. You'll notice colour-coded dies on the tool head that match standard marine terminals. Red is for 0.5 to 1.5mm² (22-18 AWG), Blue covers 1.5 to 2.5mm² (16-14 AWG), and Yellow handles 4.0 to 6.0mm² (12-10 AWG). For a reliable finish, Bivo’s Ratchet Crimp Tool is the essential trade-grade choice for Australian boaties who value "do it once, do it right" reliability.
Step 2: Precision Stripping. Use a dedicated wire stripping tool to remove exactly 6mm to 8mm of insulation. Be careful not to nick the tinned copper strands. Damaged strands lead to hot spots and eventual wire fatigue.
Step 3: The Crimp and Tug Test. Place the terminal in the correct colour-coded die. Insert the wire until the insulation meets the internal stop. Squeeze the handles until the ratchet releases. Always perform a firm "tug test" afterwards. If the wire moves even a millimetre, the crimp is a failure.
Step 4: The Waterproof Seal. Marine environments are brutal. Use a heat gun to shrink the adhesive-lined tubing on the terminal. This creates an airtight seal that prevents salt air from wicking into the wire.
Common Crimping Mistakes to Avoid
Under-crimping is a major fire hazard. It creates high resistance, which generates heat when the circuit is under load. Conversely, over-crimping with non-ratchet tools can shear the delicate tinned strands inside the barrel. Never use non-insulated terminals in the bilge or exposed areas; they'll corrode within a single season. A classic rookie error is forgetting to slide your heat shrink tubing onto the wire before you make the join. It's a simple mistake that forces you to cut the wire and start again, wasting time and materials.
With 30 years in the industry, we've seen that a mechanical crimp outperformed a solder joint in almost every high-vibration marine application. If you need gear that stands up to the Tasman Sea or the local boat ramp, we're here to help you.
Shop trade-quality marine electrical supplies at Bivo
Bivo’s Verdict: Building a Bulletproof Marine Electrical System
After 30 years in the Australian marine industry, we've seen every wiring mistake in the book. The debate over soldering vs crimping marine wires has a clear winner in 2026. For a vessel that stays reliable in heavy swell and salty air, professional-grade crimping with integrated heat-shrink is the gold standard. Soldering creates a stiff, brittle section in the wire that eventually snaps under the constant vibration of a boat engine. A high-quality crimp maintains flexibility and provides a mechanical bond that won't fail when you're 20 nautical miles offshore. When evaluating soldering vs crimping marine wires, the ability to withstand mechanical stress makes crimping the superior choice for any recreational or commercial boat.
Reliability isn't just about the joiner; it's about the entire layout. We recommend using dedicated bus bars and fuse holders to keep your wiring organized. A "birds nest" behind the dash leads to heat buildup and impossible troubleshooting. By centralizing your connections, you reduce the number of individual joins and create a system that's easy to inspect during your annual safety check. Using the right hardware protects your investment and ensures your fishfinder, lights, and bilge pumps perform when you need them most. Our 30 years of experience has proven that a clean layout is the best defense against electrical fires.
Professional Grade Hardware for DIYers
You don't need a trade certificate to install trade-quality components. Choosing Bivo’s Heat Shrink Crimp Joiners prevents the most common cause of electrical failure: moisture ingress. These terminals feature an adhesive-lined sleeve that melts around the wire insulation, creating a 100% waterproof seal. It’s the same gear used by commercial fleet operators across Australia. If you're managing multiple vessels or working in the industry, check out our guide on Wholesale Marine Hardware Australia for trade-specific supply details and bulk options.
Fast & Free Delivery Australia Wide
We know that boat projects usually happen on the weekend. That's why we prioritize rapid dispatch from our Sydney warehouse. We offer Fast & Free Delivery Australia Wide to get your parts to your door without delay. If you're unsure which terminal size you need for your specific gauge of tinned copper wire, our team is just a phone call away. We're here to help you get the job done right the first time. Don't settle for hardware store substitutes that corrode in months. Shop Bivo’s full range of marine electrical supplies today and build a system that stands the test of time.
Build a Bulletproof Marine Electrical System Today
Reliable boat wiring comes down to choosing the right method for the harsh Australian environment. While soldering works for home electronics, it creates brittle points that fail under constant hull vibration. Professional crimping remains the marine industry standard in 2026 because it maintains wire flexibility and prevents moisture wicking. Bivo provides trade grade components that deliver high value for money for every project.
We've supported the marine sector for over 30 years. We understand that your time on the water is valuable. Every connection you make should be a permanent one. When you compare soldering vs crimping marine wires, the mechanical strength of a proper crimp is the only way to ensure long term safety. Our ratchet tools meet professional specifications every time you use them.
Upgrade your boat’s wiring with Bivo’s professional Ratchet Crimp Tools and Waterproof Connectors. We provide Fast & Free Delivery Australia Wide to get your vessel back on the water sooner. We're here to help you build a system that stands up to the elements. Your next adventure depends on a connection you can trust.
Frequently Asked Questions
Is it ever okay to solder a wire on a boat?
Soldering is only acceptable when it's used to supplement a mechanical connection, according to ABYC E-11 standards. You must never rely on solder as the sole source of mechanical strength for a joint on a vessel. In 95% of marine applications, a high-quality crimp is the safer and more reliable choice. Solder can wick up the wire, creating a rigid point that eventually fails under the stress of constant hull vibration.
What is the best crimp tool for marine use?
The best tool for boat wiring is a professional-grade ratcheting crimper with interchangeable dies. These tools ensure that the crimp cycle completes fully before the jaws release, providing consistent pressure every time. Non-ratcheting pliers-style tools often fail to create the 360-degree compression required for a gas-tight seal. We recommend tools that meet AS/NZS 3004.2 standards to ensure your connections withstand the harsh Australian coastal environment.
Why does solder make wires brittle in high-vibration areas?
Solder creates a brittle point because the molten metal wicks up the stranded wire under the insulation through capillary action. This process turns flexible tinned copper into a solid, rigid rod that cannot flex. On a boat, where engines and waves create constant movement, this rigidity leads to stress fractures at the end of the solder joint. Marine survey data indicates that 15% of electrical failures in older vessels are caused by these cracked solder joints.
Do I need to use special wire for marine electrical systems?
You must use multi-stranded tinned copper wire, specifically rated as Type III marine wire. Standard automotive or household wire lacks the protective tin coating required to resist the salt-air corrosion found in Australian waters. Marine-grade wire features a strand count that's typically 15% higher than standard wire. This higher strand count provides the essential flexibility needed to prevent work-hardening and breakage during rough offshore conditions.
How do I know if my crimp connection is strong enough?
Perform a firm "tug test" by pulling on the wire and terminal with approximately 5kg to 10kg of force. A proper crimp should hold firm without any movement or the wire slipping from the barrel. You should also visually inspect the terminal to ensure the wire strands are visible at the end of the barrel. This confirms you've achieved a gas-tight seal, which prevents internal oxidation and maintains low resistance over time.
Can I use a lighter instead of a heat gun for heat shrink?
You should always use a controlled heat gun rather than a lighter for shrinking marine terminals. Lighters produce uneven heat and can reach temperatures exceeding 800 degrees Celsius, which often chars the insulation or creates weak spots in the plastic. A dedicated heat gun provides a steady flow of air at approximately 250 degrees Celsius. This ensures the internal adhesive flows evenly to create a 100% waterproof seal around your connection.
What color crimp terminal do I need for my wire size?
Terminal colors are standardised based on the cross-sectional area of the wire in millimetres squared. Use Red terminals for small wires between 0.5mm² and 1.5mm², Blue for medium wires from 1.5mm² to 2.5mm², and Yellow for larger 4mm² to 6mm² cables. Choosing the correct size is vital when considering soldering vs crimping marine wires because an oversized barrel won't create the necessary mechanical bond, leading to high resistance and potential heat buildup.
Are heat shrink solder connectors as good as crimping?
Solder-sleeve connectors are generally not as reliable as a high-quality crimp and heat shrink combination for primary wiring. While they are convenient for quick repairs, they don't provide the same mechanical pull-strength required by Australian marine standards. When evaluating soldering vs crimping marine wires, remember that professional installers prefer crimping because it creates a cold-weld bond. This bond is far more resistant to the thermal expansion and contraction cycles found in boat engine bays.