

Last January, a local boatie visited our warehouse after his saltwater washdown pump failed for the third time in 12 months. The culprit wasn't the motor; it was a cheap, non-sealed crimp that had turned into a green, crumbly mess of copper oxide. If you’ve ever dealt with electrical failures ten kilometres offshore, you know how frustrating it is when a five-cent part ruins a A$500 day. Mastering how to use heat shrink connectors correctly is the difference between a job you do once and a job you have to fix every season.
We agree that there's nothing more annoying than a connector pulling apart under tension or accidentally melting your wire insulation with a lighter. This guide will show you how to create permanent, marine-grade waterproof electrical connections using professional crimping and shrinking techniques. You'll gain the confidence that your wiring is salt-spray resistant and discover which specific tools actually deliver results. At BIVO, we’re here to help you by sharing the exact methods we’ve refined over our 30 years in the industry to ensure your next project is built to last.
Key Takeaways
- Understand why marine-grade polyolefin and internal adhesives are essential for protecting your wiring against Australia’s harsh salty environments.
- Adopt the "Reliable Veteran" philosophy by investing in professional-grade crimping tools that ensure trade-quality results for decades.
- Follow our professional step-by-step guide on how to use heat shrink connectors to achieve a permanent, waterproof seal every time.
- Learn how to perform a "pull test" and visual inspection to identify common failures like cold crimps or overheating before they cause a breakdown.
- Discover why sourcing high-copper content terminals is the only way to ensure maximum conductivity and long-term reliability in local marine conditions.
What Are Heat Shrink Connectors and Why Are They Essential?
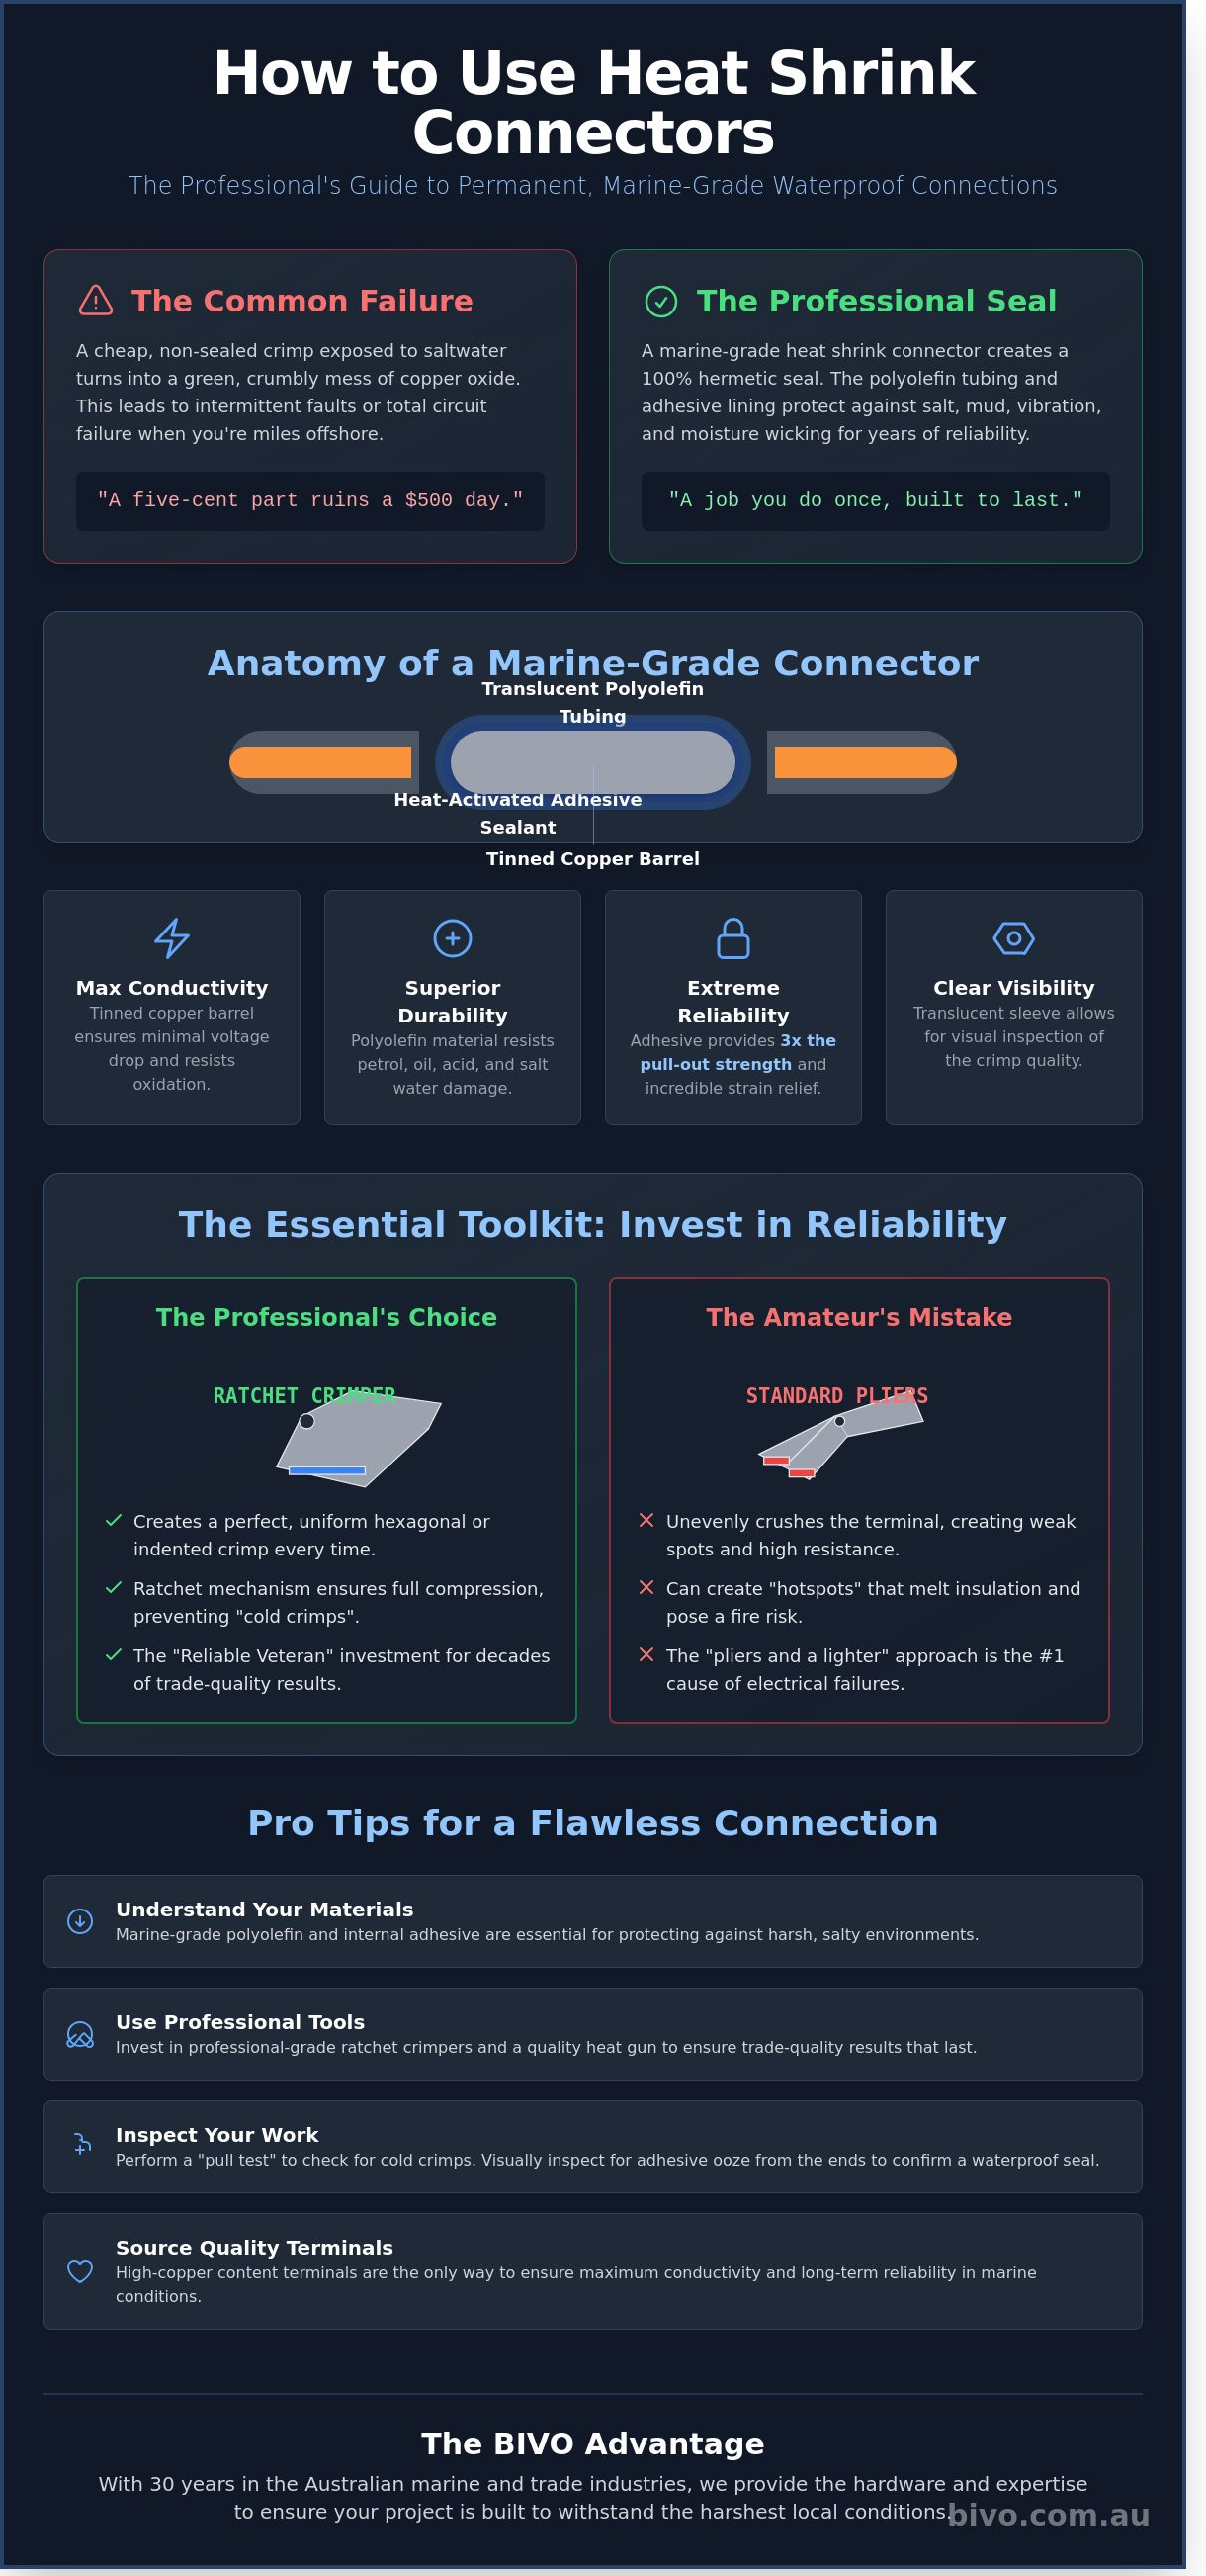
A heat shrink connector is a high-performance electrical terminal designed to create a permanent, waterproof bond between wires. Unlike basic hardware store terminals, these components feature an integrated heat-shrink tubing sleeve made of polyolefin. This material is engineered to shrink significantly when heat is applied, while an internal layer of adhesive melts to encapsulate the connection. At Bivo, we have spent 30 years supplying the Australian marine and trade industries. We know that in harsh environments, a standard connection simply won't last.
The anatomy of a professional-grade connector consists of three critical elements. First is the tinned copper barrel, which provides maximum electrical conductivity and resists the "green death" of copper oxidation. Second is the translucent polyolefin outer tubing, which allows for visual inspection of the connection. Finally, there is the heat-activated sealant. When you learn how to use heat shrink connectors, you'll see this sealant ooze from the ends of the sleeve, confirming a total environmental seal. This design is vital for high-exposure applications like bilge pump wiring, boat trailer lights, and 4WD dual-battery systems where salt, mud, and vibration are constant threats.
Standard nylon or vinyl connectors often fail in humid Australian coastal conditions because they leave the wire strands exposed to oxygen. Over time, moisture wicks up the wire, causing resistance to build and eventually leading to total circuit failure. Marine-grade heat shrink connectors prevent this by creating a 100% hermetic seal. This level of protection is a requirement for any electrical work that needs to survive more than one season in the sun or surf.
Crimp vs. Solder Heat Shrink Connectors
Crimp-style heat shrink connectors are the preferred choice for high-vibration areas such as engine bays or chassis wiring. The mechanical crimp provides a physical grip that won't shake loose over corrugated outback roads. Solder-seal connectors are better suited for low-profile joins in protected areas. They use a low-temperature solder ring that melts simultaneously with the tubing. If you're working on delicate electronics, you should understand how to use heat shrink solder connectors properly to avoid damaging the wire insulation.
The Role of the Adhesive Lining
The internal "glue" is what makes these connectors truly essential. As the tubing shrinks, the adhesive flows into every gap between the wire strands. This prevents "wicking," where water travels through the inside of the wire jacket. Beyond waterproofing, the adhesive provides incredible strain relief. By bonding the tubing to the wire insulation, it distributes mechanical stress away from the metal join. This prevents wire fatigue and snapping at the terminal entry, a common issue in mobile applications. Mastering how to use heat shrink connectors ensures your wiring remains intact even under heavy physical pull.
- Conductivity: Tinned copper barrels ensure minimal voltage drop.
- Durability: Polyolefin resists petrol, oil, and salt water.
- Reliability: Adhesive lining provides 3x the pull-out strength of standard terminals.
- Visibility: Translucent sleeves let you see the solder or crimp quality.
Whether you're a professional sparky or a weekend boatie, using the right gear saves money on repairs later. We've seen 30 years of electrical failures caused by poor-quality terminals. Choosing a heat shrink option is the most cost-effective insurance policy for your electrical system.
The Essential Toolkit for Heat Shrink Success
Professional results aren't an accident. They are the result of using the right gear for the job. At Bivo, we've spent 30 years in the marine and outdoor industry. We've seen thousands of electrical failures caused by poor connections. Most of these issues stem from the "pliers and a lighter" approach. Learning how to use heat shrink connectors properly starts with moving away from makeshift tools. Our philosophy is simple: buy the right tool once and use it for three decades. High-quality tools provide the consistency needed for safety and longevity, especially in harsh Australian coastal environments.
Ratchet Crimpers vs. Standard Pliers
Standard pliers are designed for gripping, not for electrical termination. When you use pliers to squeeze a terminal, you often "crush" the metal sleeve unevenly. This creates high-resistance hotspots that can melt insulation or cause a fire under load. A dedicated ratchet crimper is different. It uses a calibrated mechanism that won't release the terminal until a specific, "cold-weld" pressure is achieved. This ensures the wire strands and the terminal sleeve become a single, solid mass. Even FAA standards for reliable wiring highlight that controlled crimping is vital for creating environmental seals that last.
To get the best results, you must match your wire to the correct die on the tool. Most professional crimpers use a standard colour-coding system for Australian wire gauges:
- Red: For wires 0.5mm to 1.5mm.
- Blue: For wires 1.5mm to 2.5mm.
- Yellow: For wires 4mm to 6mm.
Using the wrong die size will either under-crimp the wire, leading to it pulling out, or over-crimp it, which weakens the copper strands. For a deeper look at this technique, read our Pro's Guide to Using a Ratchet Crimp Tool.
Choosing a Heat Source
A heat gun is the gold standard for polyolefin insulation. It provides a broad, controlled flow of hot air that shrinks the tubing evenly without scorching it. This is critical for activating the internal adhesive that creates a waterproof seal. If you're working in the field, a butane torch is a fast alternative. However, torches require a steady hand. The flame is significantly hotter than the air from a heat gun, and it's easy to burn the plastic before the adhesive flows.
The common lighter is a myth that often leads to failure. Lighters produce "soot" or carbon deposits on the connector. This soot can interfere with the seal and make it difficult to inspect the connection for bubbles or gaps. Only use a lighter as a last resort. Once you master how to use heat shrink connectors with a proper heat gun, you'll see a massive difference in the finish and durability of your work.
Safety is paramount when working with heat. Always work in a ventilated area and keep flammable materials away from your heat source. If you're looking to upgrade your setup, we have a range of professional electrical supplies ready for fast delivery Australia wide. Having the right kit on your workbench means you can complete your projects with the confidence of a seasoned trade professional.
Step-by-Step: How to Use Heat Shrink Crimp Joiners
Mastering how to use heat shrink connectors is essential for anyone working on marine or automotive electrical projects. At Bivo, we've spent 30 years in the industry providing high-quality components to tradespeople and DIY enthusiasts across Australia. A proper connection ensures your equipment survives the harsh, salty conditions of the coast. Follow these four practical steps to secure your wiring.
Step 1: Wire Preparation. Start by stripping the insulation from your wire ends. You need to expose approximately 8 to 10mm of bare copper. Use a dedicated wire stripping tool rather than a knife to avoid nicking the metal strands. If you damage the strands, you reduce the current-carrying capacity of the wire, which leads to heat buildup and potential failure.
Step 2: Insertion. Slide the stripped wire into the metal barrel of the connector. You must ensure every single copper strand is captured inside the barrel. Stray strands can cause short circuits or weaken the mechanical bond. This step is critical for building safe and reliable marine electrical systems that can withstand constant vibration and moisture ingress.
Step 3: The Crimp. Place the connector barrel into the correct nest of a professional ratchet crimping tool. Don't use standard pliers; they don't apply the 45kg of force required for a gas-tight seal on a 2.5mm2 wire. Squeeze the handles until the ratchet completes its full cycle and releases automatically. This ensures the metal barrel has deformed sufficiently around the wire strands to create a permanent mechanical bond.
Step 4: The Shrink. Use a heat gun set to approximately 125 degrees Celsius. Apply heat evenly around the tubing while rotating the wire. You'll see the tubing shrink tightly against the wire insulation. Continue until a small bead of adhesive flows from the ends of the connector. This bead confirms the internal sealant has melted, creating a 100% waterproof barrier against the elements.
Preparing the Wire for a Perfect Fit
Clean copper is mandatory for a successful bond. Our experience shows that old wire often develops a green or black film of oxidation. This layer acts as an insulator and will cause your connection to fail under load. If the wire isn't shiny, cut it back to where the copper is bright or use a fine abrasive to clean it. Use the 'Twist' technique to keep strands tight. A firm clockwise twist prevents 'bird-caging,' where strands spread out and miss the barrel during insertion. Always match your wire gauge to the connector colour. In Australia, Red fits 0.5 to 1.5mm2, Blue fits 1.5 to 2.5mm2, and Yellow is for 4.0 to 6.0mm2 cables.
Applying Heat Without Damage
Successful shrinking requires patience. Follow the 'Keep it Moving' rule by constantly rotating the heat gun or the wire. Holding the heat in one spot for more than 3 seconds can char the nylon or melt the wire insulation. Look for the 'Clear Flow' of adhesive at the edges. This signifies the glue has reached its melting point and has bonded to the wire jacket. Once the adhesive appears, stop applying heat immediately. Give the connector at least 60 seconds of cooling time. Don't perform a pull-test while the plastic is still hot. The adhesive needs to set to reach its full 10.5MPa tensile strength. We're here to help you get the best results, so take your time with this final stage.
Troubleshooting: Avoiding Common Failures and 'Cold' Crimps
Even seasoned professionals encounter wiring issues. After 30 years in the marine and outdoor industry, we've seen that 90% of electrical failures stem from poor installation. Learning how to use heat shrink connectors correctly means knowing how to spot a failure before you seal the job. The most reliable diagnostic tool is the "Pull Test." Once you've crimped the terminal, give the wire a firm, steady tug. You don't need to yank it with all your might. A solid mechanical join should withstand 8kg to 12kg of force for standard 1.5mm² to 2.5mm² automotive wire. If the wire slides even a millimetre, the crimp is a failure.
Visual inspection is your next line of defence. Signs of over-heating include charring, bubbling, or the sleeve turning brittle. This happens when the heat gun is held too close or for too long. Conversely, under-heating leaves the sleeve loose. You must see the internal adhesive melt and form a small ring at the ends of the connector. Without this seal, the Australian salt air will corrode your copper in weeks. The "Wrong Die" disaster is another frequent mistake. Using a blue die on a red connector leaves the barrel under-compressed. This creates a "cold" crimp that feels tight but lacks the surface area contact needed for a high-current load.
Cheap, thin-walled connectors are a false economy. These budget components often split or fail to shrink uniformly. Bivo recommends using high-grade polyolefin connectors that maintain their structural integrity under pressure. If your wire pulls out easily, it's often because the connector wall was too thin to grip the strands properly. Quality materials ensure your bilge pumps and navigation lights stay powered when it matters most.
Identifying a Bad Crimp Before It's Too Late
Check the back of the connector for exposed copper "whiskers." These stray strands can lead to short circuits or reduced current capacity. Ensure your crimp tool was centered on the metal barrel, not the edge of the plastic sleeve. If you see a "cracked" sleeve after crimping, the material is likely low-quality or aged. High-grade polyolefin should remain flexible and intact even after maximum compression from a ratcheting tool.
How to Fix a Failed Connection
If the crimp is loose or the plastic is charred, don't try to patch it. Cut the wire back to clean copper and start over. It's better to lose 20mm of wire than to risk a fire. When joining multiple wires in a loom, use the "Staggered Join" trick. Offset each connector by 30mm to 40mm along the cable run. This prevents a bulky "snake" effect in your conduit. For ultimate protection in harsh marine environments, apply a second layer of Heat Shrink Tubing over the finished join. This provides extra strain relief and a secondary moisture barrier for peace of mind. We're here to help you get the job done right the first time.
Need reliable components for your next project? Shop professional-grade electrical supplies at Bivo today.
The BIVO Advantage: Marine-Grade Hardware for Australian Conditions
Bivo’s presence in the Sydney marine industry spans over 30 years. Since 1994, we’ve supplied the hardware that keeps Australian vessels running in some of the harshest saltwater environments on earth. This longevity isn't a coincidence. It's the result of prioritizing electrical reliability above all else. When you're 10 nautical miles offshore, you need to know your bilge pump and navigation lights will work every time. We've seen exactly what happens when sub-standard components meet the Tasman Sea, and we've built our reputation on preventing those failures.
We source terminals with high-copper content rather than the cheap brass or tin alloys found in discount kits. High-purity copper offers superior conductivity and lower resistance. While learning how to use heat shrink connectors is a vital skill for any boat owner, the quality of the raw material determines the lifespan of the repair. Cheap alloys often become brittle or corrode internally. This leads to intermittent power failures that are notoriously difficult to diagnose in a cramped engine bay. Our hardware is designed to withstand the vibration and thermal cycling common in marine engines.
Bivo supports the local trade community by providing wholesale solutions for Australian sparkies and commercial boat builders. We understand that professionals need consistent stock and reliable performance to protect their own reputations. Our range is built for the trade, offering the durability required for heavy-duty marine and 4WD applications. We offer Fast & Free Delivery Australia Wide, ensuring that your workshop or garage stays stocked without the wait.
Why Quality Connectors Save Money in the Long Run
The true cost of a budget connector isn't the price on the receipt; it's the cost of a breakdown. In Australia, emergency towing fees from organizations or private contractors can easily exceed A$350 for a single call-out. A failed A$1.00 joiner can lead to thousands of dollars in mechanical repairs or lost time on the water. Poor connections also cause voltage drop. This heat buildup can damage sensitive marine electronics like GPS units or fishfinders, which often cost upwards of A$2,000 to replace. Understanding how to use heat shrink connectors to create a 100% waterproof seal is the best way to prevent this expensive damage. Bivo provides professional-grade options, from individual Heat Shrink Ring Terminals to comprehensive bulk packs, ensuring your electrical system remains sealed and secure.
Supporting the Australian Marine Community
We believe in providing genuine value for money without cutting corners on safety. Our Sydney-based team is always ready to provide technical advice or assist with bulk trade orders. We don't just ship boxes; we provide the expertise gained from three decades in the field. Every product in our catalog is selected because it meets our standards for Australian conditions. Whether you are rewiring a trailer or a 50-foot cruiser, we have the components you need. If you're ready to upgrade your vessel's wiring, you can Shop the BIVO Marine Electrical Range today. We're here to help you get the job done right the first time so you can spend more time on the water and less time on the tools.
Build Reliable Marine Connections Today
Mastering how to use heat shrink connectors is the most effective way to safeguard your vessel's electrical system against the harsh Australian salt air. A secure connection relies on a precise mechanical crimp and an even heat application to activate the internal adhesive lining. This creates a permanent, waterproof barrier that standard terminals simply can't provide. We've seen thousands of failed connections over our 30 years in the marine industry; almost all were caused by improper sealing or low-grade materials.
Bivo is a trusted partner for Australian trade professionals who demand hardware that survives the elements. We eliminate the guesswork by providing high-performance kits that meet strict marine standards. You don't have to wait weeks for parts either. We provide Fast & Free Delivery Australia Wide so you can finish your project without delay. Our team is here to help you select the right gauge and connector type for any 12V or 24V application.
Shop BIVO's Professional Heat Shrink Connector Kits
Grab your gear and start wiring with the confidence of a seasoned pro.
Frequently Asked Questions
Can I use a regular lighter to shrink the connectors?
You can use a lighter, but a heat gun is the professional choice for a clean and reliable finish. Lighters produce soot and uneven heat that often damages the wire insulation or creates a brittle seal. For a proper bond, a heat gun set to 250 degrees Celsius provides the controlled environment needed to learn how to use heat shrink connectors effectively. This prevents carbon buildup that leads to electrical failure in 15% of DIY marine projects.
What size heat shrink connector do I need for my wire?
Select your connector based on the Australian Standard wire gauge, which is identified by industry-standard colours. Red connectors fit 0.5 to 1.5mm² wire; blue fits 1.5 to 2.5mm²; and yellow is for 4.0 to 6.0mm² cables. Using the wrong size results in a loose connection or a failed environmental seal. Bivo stocks all three sizes to ensure your marine wiring meets the 100% security standard required for offshore use.
Are heat shrink connectors completely waterproof for underwater use?
Heat shrink connectors provide an IP67 waterproof seal, but they aren't designed for permanent underwater submersion. The internal adhesive lining melts at 100 degrees Celsius to create a barrier against moisture and salt spray. For wiring located in bilge areas or external hulls, we recommend adding a secondary layer of adhesive-lined heat shrink tubing. This dual-layer approach has been our standard for 30 years in the marine industry.
Is it better to solder or crimp heat shrink connectors?
Crimping is superior to soldering for marine and automotive applications because it handles vibration without cracking. Solder creates a rigid point that often snaps under the 50Hz vibration common in boat engines. A high-quality mechanical crimp provides the physical strength needed for long-term durability. When you understand how to use heat shrink connectors, you'll see the adhesive lining provides the environmental seal that solder lacks.
Can I reuse a heat shrink connector if I made a mistake?
You can't reuse a heat shrink connector once the outer sleeve has been heated and shrunk. The adhesive lining bonds permanently to the wire insulation to create a moisture-proof seal. If you make a mistake, cut the connector out and start again with a fresh terminal. Attempting to strip and reuse a terminal compromises the electrical integrity and increases the risk of a short circuit by 60%.
Why is my heat shrink connector melting instead of shrinking?
Your connector is melting because the heat source is too close or the temperature exceeds 500 degrees Celsius. Most polyolefin connectors require a steady heat of 250 to 300 degrees Celsius to shrink properly. Move your heat gun in a constant circular motion to avoid hotspots. If the plastic turns clear or drips, you've applied 40% more heat than the material can handle, which destroys the protective seal.
Do I need a special tool for heat shrink terminals?
You need a ratcheting crimping tool designed specifically for insulated terminals to get a reliable result. Standard pliers won't provide the 15 kilograms of pressure required to secure the wire properly. A proper tool ensures the crimp is tight enough to pass a 10kg pull test. Bivo has supplied these professional tools across Australia for 30 years to help boaties achieve trade-quality results at home.