

Imagine you are five kilometres off the coast of Queensland when your sounder flickers and dies because a corroded glass fuse holder finally gave up. It is a frustrating, avoidable failure that Bivo has seen ruin countless weekends over our 30 years in the industry. You likely already know that a "bird's nest" of wires crowded onto your battery terminals is a safety hazard and a nightmare to troubleshoot. Salt air and constant vibration eventually turn messy DIY wiring into a reliability gamble that no boat owner should take.
This guide teaches you exactly how to install a marine fuse box to transform your vessel's DC circuits into a professional, centralised system. We provide a clear, step-by-step process to help you achieve trade-quality results that stand up to harsh Australian conditions. You'll learn how to mount your panel, size your cables correctly, and eliminate terminal clutter for good. We're here to help you get your boat's electrical system shipshape and ready for the 2026 season.
Key Takeaways
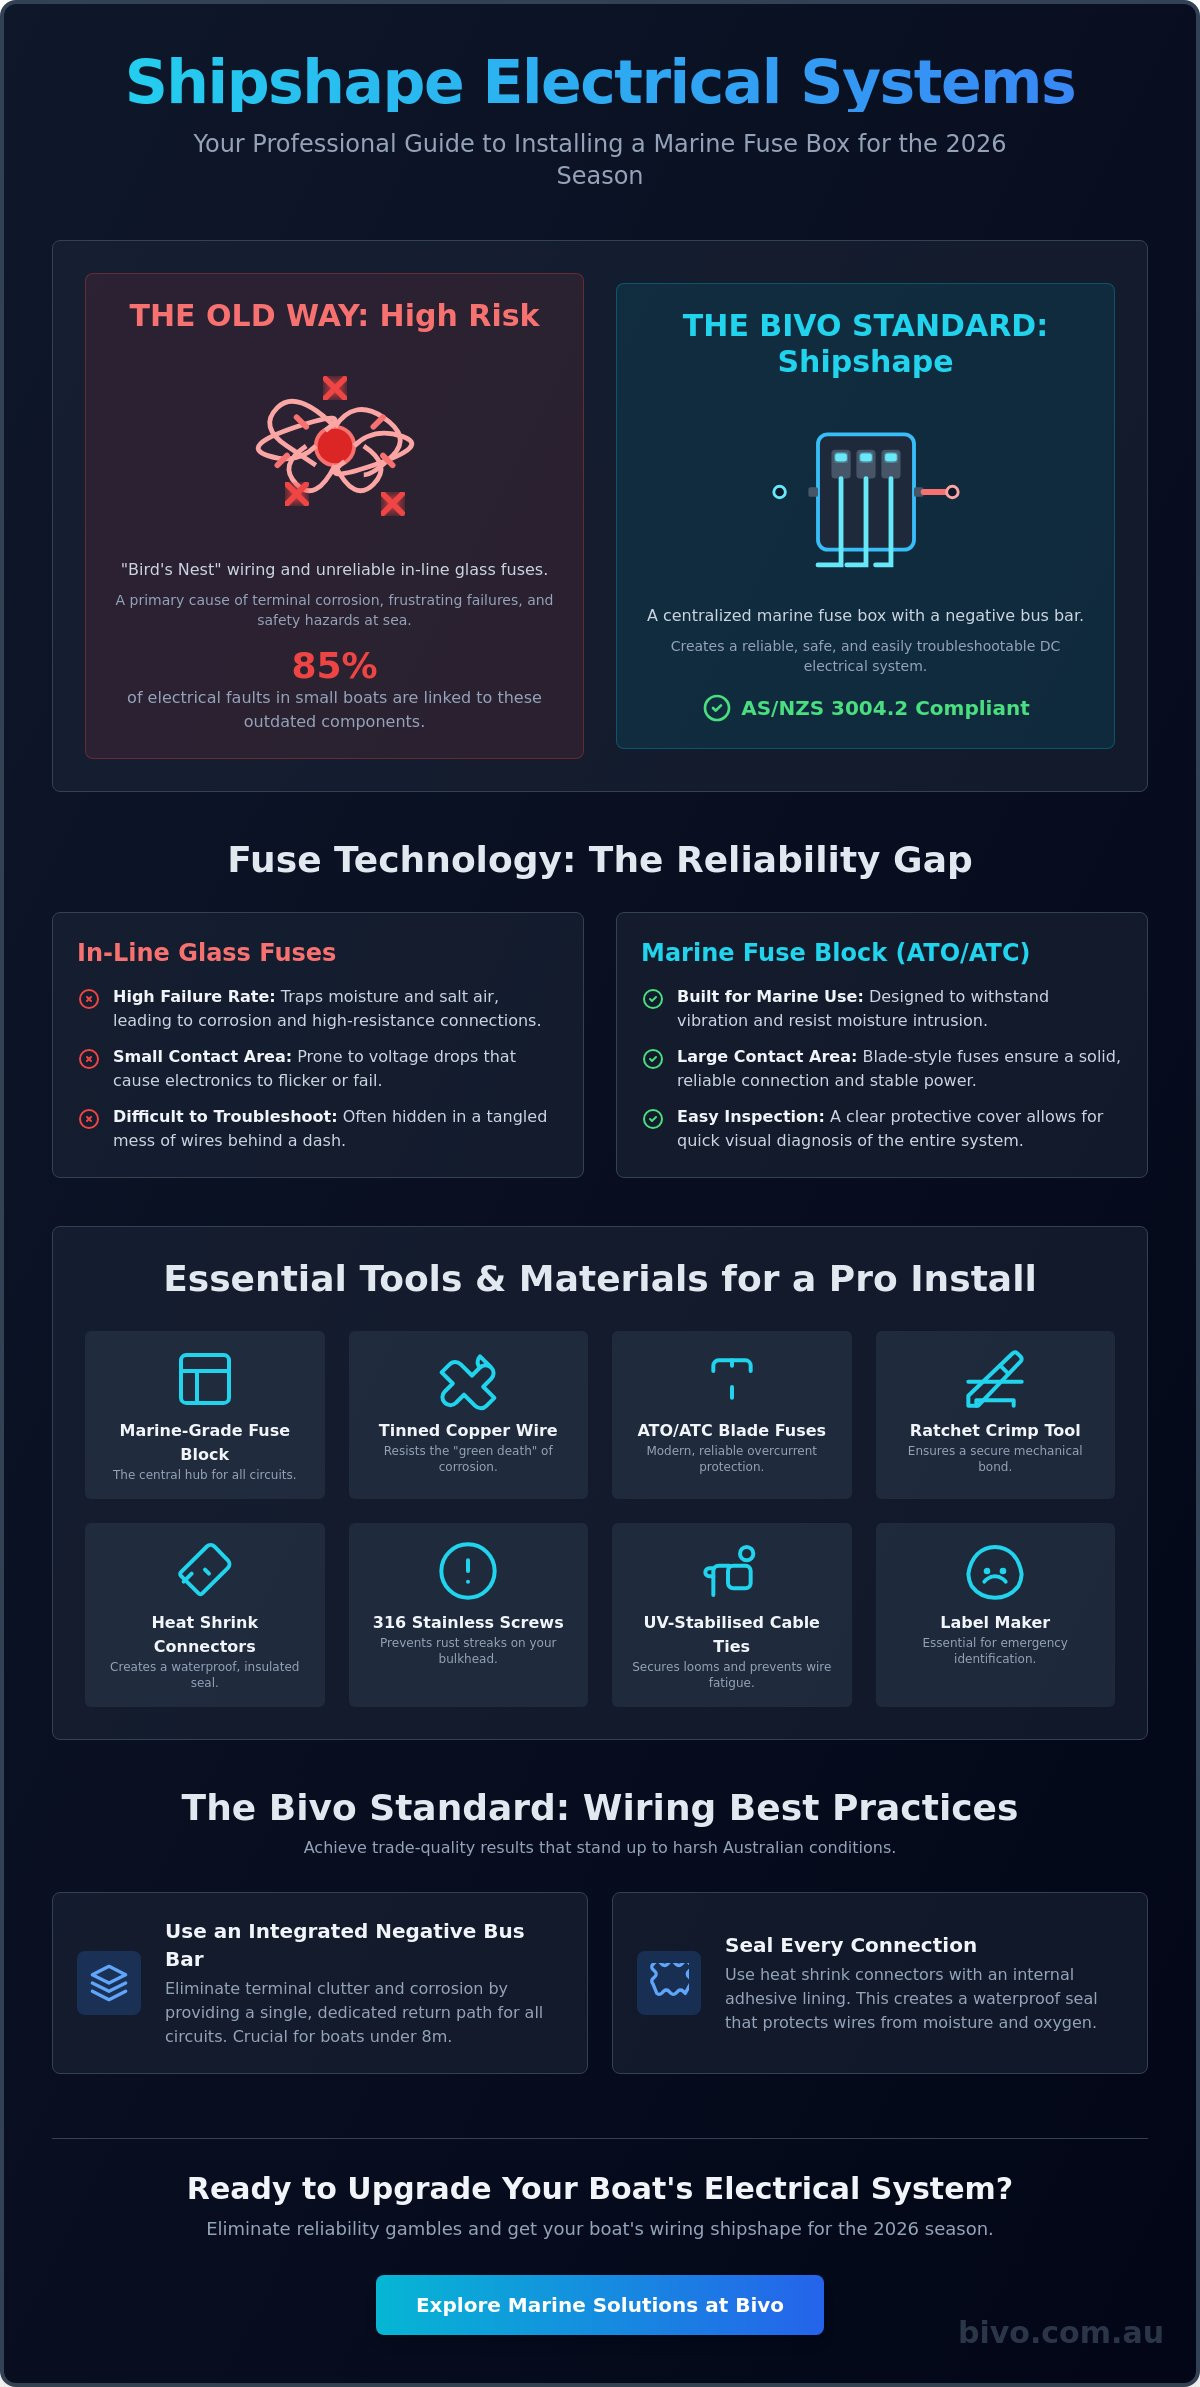
- Eliminate the primary cause of marine electrical failure by replacing unreliable in-line glass fuses with a centralized distribution block.
- Follow our professional step-by-step guide on how to install a marine fuse box using tinned copper wire and ratchet crimp tools for a sea-ready finish.
- Learn the "Bivo Standard" for organizing and labeling circuits to ensure every connection is identifiable during an emergency.
- Identify the ideal dry mounting locations to minimize wire runs and protect your electrical system from the harsh Australian marine environment.
- Master simple diagnostic techniques and annual maintenance routines to keep your boat’s power flowing reliably throughout the 2026 season.
Why a Marine Fuse Box is Essential for Your Boat in 2026
A marine fuse box, also known as a fuse block, serves as the central distribution hub for your vessel's DC electrical system. It takes a single high-amperage feed from your battery and splits it into multiple protected circuits for your GPS, fishfinder, bilge pump, and lights. Understanding how to install a marine fuse box is a fundamental skill for any boat owner looking to improve reliability. Bivo has seen three decades of marine electrical trends, and the shift toward centralized protection is the single most important upgrade you can make for your safety.
Traditional "in-line" glass fuse holders are a major liability. Industry experience suggests these cheap plastic components are responsible for approximately 85% of electrical faults in small boats. They trap salt air and moisture, leading to high-resistance connections that generate heat and eventually fail. A centralized fuse block eliminates these weak points. It provides a clean, professional layout that meets the safety requirements of AS/NZS 3004.2:2014, which governs electrical installations on Australian vessels. Centralisation makes troubleshooting simple and keeps your battery terminals free from corrosion.
Fuse Blocks vs. In-line Fuses: The Reliability Gap
Modern fuse blocks utilize blade-style Automotive Fuses, which offer a much larger surface area for electrical contact than old-fashioned glass cylinders. This design prevents the voltage drops that cause electronics to flicker or reboot. When you learn how to install a marine fuse box, you also gain the benefit of a clear, protective cover. This allows for a visual inspection of your entire system in seconds. If a circuit fails at sea, you can identify the blown fuse immediately without digging through a tangled mess of wires behind the dash.
Understanding the Negative Bus Bar Integration
Choosing a fuse box with an integrated negative bus bar is the best move for boats under 8 metres. This feature provides a single, dedicated return path for every component on your boat. It stops the common mistake of stacking ten different eyelet terminals onto a single battery post, which is a primary cause of terminal corrosion. A consolidated negative bus reduces wire clutter and simplifies the circuit path. This organization is vital for preventing electrolytic corrosion, a process that can destroy expensive marine components if your grounding is poorly managed. A clean install looks better and lasts longer in harsh saltwater environments.
Essential Tools and Materials for a Professional Install
Mastering how to install a marine fuse box starts with selecting the right gear. In the harsh Australian climate, salt spray and humidity act as constant threats to your electrical system. You need a marine-grade fuse block, tinned copper wire, and ATO or ATC fuses. These components are designed to withstand vibration and moisture much better than standard automotive parts. Cheap alternatives often lead to high-resistance connections and eventual system failure.
A professional install requires a specific material checklist. Gather 316-grade stainless steel mounting screws to prevent rust streaks on your bulkhead. Use UV-stabilised cable ties to secure your looms and prevent wire fatigue. A label maker is essential; every circuit must be clearly identifiable during an emergency on the water. Referencing U.S. Coast Guard Marine Electrical Standards provides a reliable framework for wire sizing and overcurrent protection, ensuring your DIY work meets global safety benchmarks.
Tinned copper wire is the only choice for serious boaties. Tinned copper wire resists the "green death" of corrosion because the tin coating prevents the copper from reacting with salt and moisture. Without this coating, standard copper wire turns into a brittle green powder that won't conduct electricity, often hidden deep inside the insulation where you can't see it until it's too late.
Choosing the Right Heat Shrink Connectors
Standard crimp connectors leave wire strands exposed to oxygen and moisture. For a waterproof seal, use heat shrink connectors featuring an internal adhesive lining that melts when heated. It's vital to follow the industry colour-coding system: Red for 0.5 to 1.5mm² wire, Blue for 1.5 to 2.5mm², and Yellow for 4.0 to 6.0mm². While standard crimps are common, heat shrink solder connectors offer the best protection in high-moisture bilge areas by providing both a mechanical and soldered bond.
The Importance of a Quality Ratchet Crimp Tool
Cheap "crush" style crimpers found at local hardware stores are the leading cause of marine electrical fires. They create inconsistent pressure, which leads to loose wires that arc and generate heat. The "BIVO Standard" toolkit relies on a professional ratchet crimp tool to ensure a consistent, gas-tight mechanical bond every time. This tool won't release until the correct pressure is reached, giving you a factory-grade finish that won't vibrate loose in heavy swells.
We've spent 30 years in the industry seeing the results of poor wiring. Getting the right gear the first time saves you money and stress. If you're unsure which wire gauge or fuse block suits your boat, our team is here to help you find the exact components for a safe installation.
Step-by-Step Guide: How to Install a Marine Fuse Box
Installing a marine fuse box correctly protects your vessel from electrical fires and prevents damage to expensive electronics. Start by disconnecting the negative battery cable. This simple safety step eliminates the risk of accidental short circuits during the installation process. Map your existing electronics and label every wire clearly. Knowing exactly which cable belongs to the bilge pump or the fishfinder saves time and prevents wiring errors later. Choose a mounting location that is dry, ventilated, and easy to reach. High positions inside a console or locker are best. Avoid the bilge area to minimize moisture exposure, even if your fuse block is marine-rated.
Mounting Solutions for Different Hull Types
Aluminium boats require a specific approach to prevent galvanic corrosion. Use a Starboard or PVC mounting plate as an insulator between the fuse block and the hull. Never drill directly into the aluminium structure if it can be avoided. For fibreglass boats, epoxy-backed mounting blocks are the professional choice. These allow you to secure the fuse box without drilling through the gelcoat or compromising the core material. Many boaties encounter the "sharp screw" problem, where fasteners protrude through thin bulkheads. Always measure your mounting surface thickness first. We recommend using 316-grade stainless steel fasteners to ensure longevity in salty Australian conditions.
Sizing Your Main Power Cables
Selecting the right wire gauge is the most critical part of learning how to install a marine fuse box safely. Calculate your total amperage load by adding the maximum draw of every device you plan to connect. For example, if your lights, pumps, and sounder total 25 amps, your main feed must handle that load comfortably. Use the 3% voltage drop rule for critical electronics like GPS units and fishfinders. These devices often malfunction or reboot if they don't receive steady power. For a typical 4-metre run with a 30-amp load, 10mm² tinned copper wire is generally the standard. You must install a master circuit breaker within 180mm of the battery. This protects the heavy-gauge supply wire from overheating if a major short occurs between the battery and the fuse block.
In our 30 years of industry experience, we've found that using tinned copper wire is non-negotiable for Australian boaters. Standard automotive wire will corrode quickly in a marine environment. Once your main feed is connected, wire each individual accessory to the fused terminals. Use heat-shrink ring terminals for every connection to keep moisture out. This creates a professional, reliable system that stands up to heavy swells and salt spray. We're here to help you get your electrical system right the first time.
Wiring and Connection Best Practices for 2026
Learning how to install a marine fuse box correctly is only half the battle. The quality of your wiring determines whether your electronics survive the first season of salt spray or fail when you're 10 miles offshore. We've spent 30 years in the marine industry, and we know that tidy wiring isn't just about aesthetics; it's about reliability. A messy "spaghetti" of wires makes it impossible to diagnose faults during a power failure.
- Organise the "Spaghetti": Use UV-stabilised nylon cable ties and adhesive mounting bases to secure wire looms every 150mm to 200mm. This prevents wires from bouncing and chafing against the hull.
- Label Every Circuit: Use a waterproof thermal label maker. In an emergency, you need to identify the bilge pump or navigation light fuse instantly without tracing wires.
- Apply Strain Relief: Ensure wires have a small "drip loop" or slack before they reach the terminal. This prevents the physical weight of the wire from pulling on the fuse block terminals, which is a leading cause of intermittent power loss.
- The Final Seal: Once connections are tight, apply a thin layer of dielectric grease or liquid electrical tape to exposed terminals. This blocks oxygen and moisture, preventing the green corrosion common in Australian coastal environments.
Correct Use of Heat Shrink Crimp Joiners
Marine environments demand waterproof connections. Standard automotive terminals will fail quickly in salt air. Using trade-quality heat shrink crimp joiners creates a permanent, submersible seal that protects the copper core.
- Step 1: Strip 6mm of insulation using a dedicated wire stripper to avoid nicking the copper strands.
- Step 2: Insert the wire into the joiner and crimp firmly using a ratcheting tool. A standard plier-style crimper often results in a weak mechanical bond.
- Step 3: Use a heat gun to shrink the tubing until the internal adhesive sealant flows from the ends.
Don't use a cigarette lighter to shrink the tubing. It chars the insulation and creates brittle spots. A common mistake is under-crimping the terminal; always give the wire a firm "tug test" before heating the shrink tube.
Managing the Negative Returns
A frequent error when people research how to install a marine fuse box is neglecting the ground side of the circuit. Every accessory needs a clean path back to the battery to function at full voltage.
- Connect Grounds: Route each accessory's negative wire directly to the common negative bus bar on your fuse block.
- Heavy-Duty Return: Run one heavy-duty 6AWG or 4AWG cable from the bus bar back to the battery's negative terminal. This is much safer and more efficient than running multiple small wires across the boat.
- Testing: Use a multimeter to check for continuity between the bus bar and the battery negative before you insert any fuses.
This single-return system reduces electrical "noise" that can interfere with fish finders and VHF radios. It makes your boat's electrical system a closed, professional loop that's easy to maintain.
Troubleshooting and Maintenance: Keeping the Power Flowing
Installing your system is only the first step toward a reliable boat. Long-term performance depends on consistent maintenance. Salt air and constant hull vibration are the primary enemies of marine electrics. You should perform a thorough inspection at least once every 12 months to catch small issues before they become expensive failures on the water.
During your annual check, look for signs of heat damage such as melted insulation or discoloured plastic around the terminals. This usually indicates a loose connection. Check every terminal for tightness using a spanner or screwdriver. Vibrations can loosen nuts over time, creating resistance that leads to heat and potential fires. If you see "green death" corrosion on any copper components, clean it immediately and apply a marine-grade dielectric grease to seal out moisture. Learning how to install a marine fuse box correctly includes knowing how to keep it in peak condition.
Common Marine Electrical Faults and Fixes
Bad grounds cause the most frequent electrical headaches in Australian vessels. If your fishfinder screen shows "noise" or your cabin lights flicker when the bilge pump kicks in, your ground bus bar is likely the culprit. You should also check for phantom draws. These are small current leaks that can drain a 100Ah battery to a flat state in just a few days. Use a multimeter to measure current flow while all switches are off to isolate the leaking circuit.
You can often identify a blown fuse by looking for a broken or charred metal filament through the clear plastic housing. If the fuse is intact but the device won't start, use a multimeter to check for 12V at the fuse block terminals. This helps you determine if the problem is a blown fuse or a broken wire further down the line. A professional, tidy installation adds significant resale value to your boat. Australian buyers pay a premium for vessels with neat, labeled, and accessible wiring systems because it proves the owner valued safety and maintenance.
Always carry a spare kit in your "ditch bag" or onboard tool cabinet. Your kit should include:
- Multimeter: This is the most important tool for testing voltage and continuity.
- Assorted Fuses: Carry a full range of ATO or Mini fuses from 5A to 30A.
- Heat-Shrink Connectors: Essential for making emergency wire repairs that resist salt spray.
- Crimp Tool: A quality tool ensures every connection is mechanical and secure.
Upgrade Your Vessel with BIVO Reliability
BIVO brings 30 years of industry experience to every product we supply. We focus on practical, professional-grade solutions that stand up to the harsh Australian sun and salt. Our team selects electrical components that offer genuine value for money and long-term durability. We provide Fast & Free Delivery Australia Wide so you can get your gear exactly when you need it. We're here to help you complete your project with confidence and safety.
Secure Your Boat’s Power for the 2026 Season
Mastering how to install a marine fuse box ensures your vessel’s electrical system remains safe and efficient in harsh saltwater environments. You now have the steps to organize your wiring, eliminate clutter, and protect expensive electronics from short circuits. Using professional trade-grade components is essential for long-term reliability and peace of mind when you're offshore. It's about more than just convenience; it's about safety for everyone on board. Correct installation prevents common failures and keeps your systems running smoothly year after year.
Bivo supports your DIY projects with over 30 years of Australian marine industry experience. We understand what works in local conditions and provide the gear that professional installers trust. When you choose Bivo, you get access to high-quality electrical solutions backed by our reputation for no-nonsense reliability. Don’t settle for inferior parts when your safety is on the line. We’re here to help you maintain a professional trade standard with every connection you make.
Upgrade your boat with a BIVO Marine Fuse Box & Crimp Kit and enjoy Fast & Free Delivery Australia Wide. Safe boating starts with a reliable power foundation.
Frequently Asked Questions
Do I need a waterproof fuse box if it is mounted inside a console?
You should always use a marine-grade, waterproof fuse box even when mounting inside a console. Salt air and high humidity are constant threats in Australian coastal environments. Standard automotive boxes often show signs of terminal corrosion within 12 months. A sealed unit with an IP66 rating prevents salt spray from reaching your connections. This keeps your electronics running and protects your investment from avoidable failure.
What size fuse should I use for my marine electronics?
Use the specific fuse size recommended by your equipment manufacturer. Most modern fish finders and GPS units require a 3-amp or 5-amp fuse to protect their internal circuitry. Never install a fuse that exceeds the maximum amperage rating of your wiring. For example, 1.5mm2 marine wire is generally rated for 15 amps. Matching the fuse to the component ensures the circuit breaks before the wire or the device overheats.
Can I mount a marine fuse box directly to an aluminium hull?
You shouldn't mount a fuse box directly to an aluminium hull. Direct contact between the plastic housing and the metal can trap moisture, leading to galvanic corrosion. Always use a marine-grade polymer or King StarBoard mounting block as an insulator. Secure the block with stainless steel fasteners and then attach your fuse box. This simple step prevents the hull from acting as a conductor and maintains your boat's structural integrity.
Should I use a fuse or a circuit breaker for my main power feed?
Use a high-amperage circuit breaker for your main power feed. Breakers allow you to manually isolate the entire system for maintenance or in an emergency. If a surge occurs, you can reset it immediately without searching for spare parts. Ensure the breaker is installed within 175mm of the battery terminal to comply with safety standards. This setup provides the best protection when learning how to install a marine fuse box.
What is the difference between a fuse block and a bus bar?
A fuse block provides individual circuit protection while a bus bar acts as a central distribution point for multiple wires. You use a fuse block on the positive side of your system to prevent overloads. A bus bar is typically used for the negative return path to keep your wiring tidy. Combining both components ensures a professional, organised layout. This makes troubleshooting much faster when you're out on the water.
How many circuits should my marine fuse box have?
Choose a fuse box with at least 20% more circuits than you currently need. If you have five accessories, an 8-way or 12-way block is the better choice. This allows for future additions like LED deck lights or a VHF radio without needing to replace the entire unit. Planning for expansion now saves you time and money on future upgrades. Our 30 years in the industry shows that boat owners always add more gear over time.
Is it better to solder or crimp marine electrical connections?
Crimping is the preferred industry standard for all marine applications. Solder creates a rigid point in the wire that often cracks under the constant vibration of a boat. Use tinned copper lugs and a professional ratcheting crimp tool for a gas-tight seal. This method provides the mechanical strength needed to withstand rough swells. Professional installers across Australia avoid solder to prevent fatigue-related electrical failures.
Can I use automotive fuses and wire on my boat?
You shouldn't use automotive wire or fuses on a boat. Automotive wire uses bare copper which oxidises and turns black quickly in salty air. Marine-grade wire features tinned copper strands that resist corrosion 10 times longer than bare copper. When you learn how to install a marine fuse box, always use components specifically rated for the marine environment. This ensures your electrical system lasts for years rather than failing during your first season.