

A standard bowline knot can reduce your rope’s breaking strength by up to 45% the moment you put it under load. For many Australian sailors, a bulky knot isn't just an eyesore; it's a liability that snags in blocks and wears prematurely. You likely understand the frustration of spending A$250 on premium polyester line only to worry about ruining it with an incorrect cut. Learning how to splice double braid rope using the core-to-core method is the essential skill that separates a DIY job from a professional rig.
At Bivo, we've spent 30 years supplying the marine industry, and we know that a proper splice is the only way to maintain 100% of your rope's integrity. We'll show you how to eliminate the confusion between cover-only and core-to-core techniques so you can rig your vessel with total confidence. This guide provides a clear, step-by-step breakdown of the tools, measurements, and tapering required to achieve a clean, high-strength finish that handles like a dream.
Key Takeaways
- Maintain 100% of your rope’s breaking strength by replacing weak knots with a professional core-to-core termination.
- Master the technical precision of how to splice double braid rope using our expert-led extraction and marking guide.
- Equip yourself with the right tools for the job, including fid kit sizing and professional marking techniques for maximum accuracy.
- Solve common splicing hurdles like "The Milk" to ensure a smooth, professional finish without the cover bunching or sticking.
- Enhance your boat’s safety and aesthetics with custom-made dock lines and fender whips tailored for Australian marine conditions.
Why Splicing Double Braid Ropes is Essential for Marine Safety
Safety on the water depends on the integrity of your rigging. Learning how to splice double braid rope isn't just about achieving a professional finish; it's a critical safety requirement for any serious vessel. A proper splice is a core-to-core termination where the load is shared equally between the inner core and the outer cover. This preserves the rope's structural integrity. Unlike a knot, a splice utilizes the "Chinese Finger Trap" effect. When tension is applied, the outer braid constricts around the inner core. This friction-based grip ensures the rope stays secure under heavy loads. It also creates a low profile. This allows the rope to pass smoothly through blocks and fairleads without snagging or jamming.
With 30 years in the marine industry, we've seen how often a simple knot leads to avoidable gear failure. Splicing ensures your lines are ready for Australia's demanding coastal conditions. It provides a permanent, reliable connection that looks as good as it performs. Using a splice instead of a knot can be the difference between a successful voyage and a broken halyard at the worst possible moment.
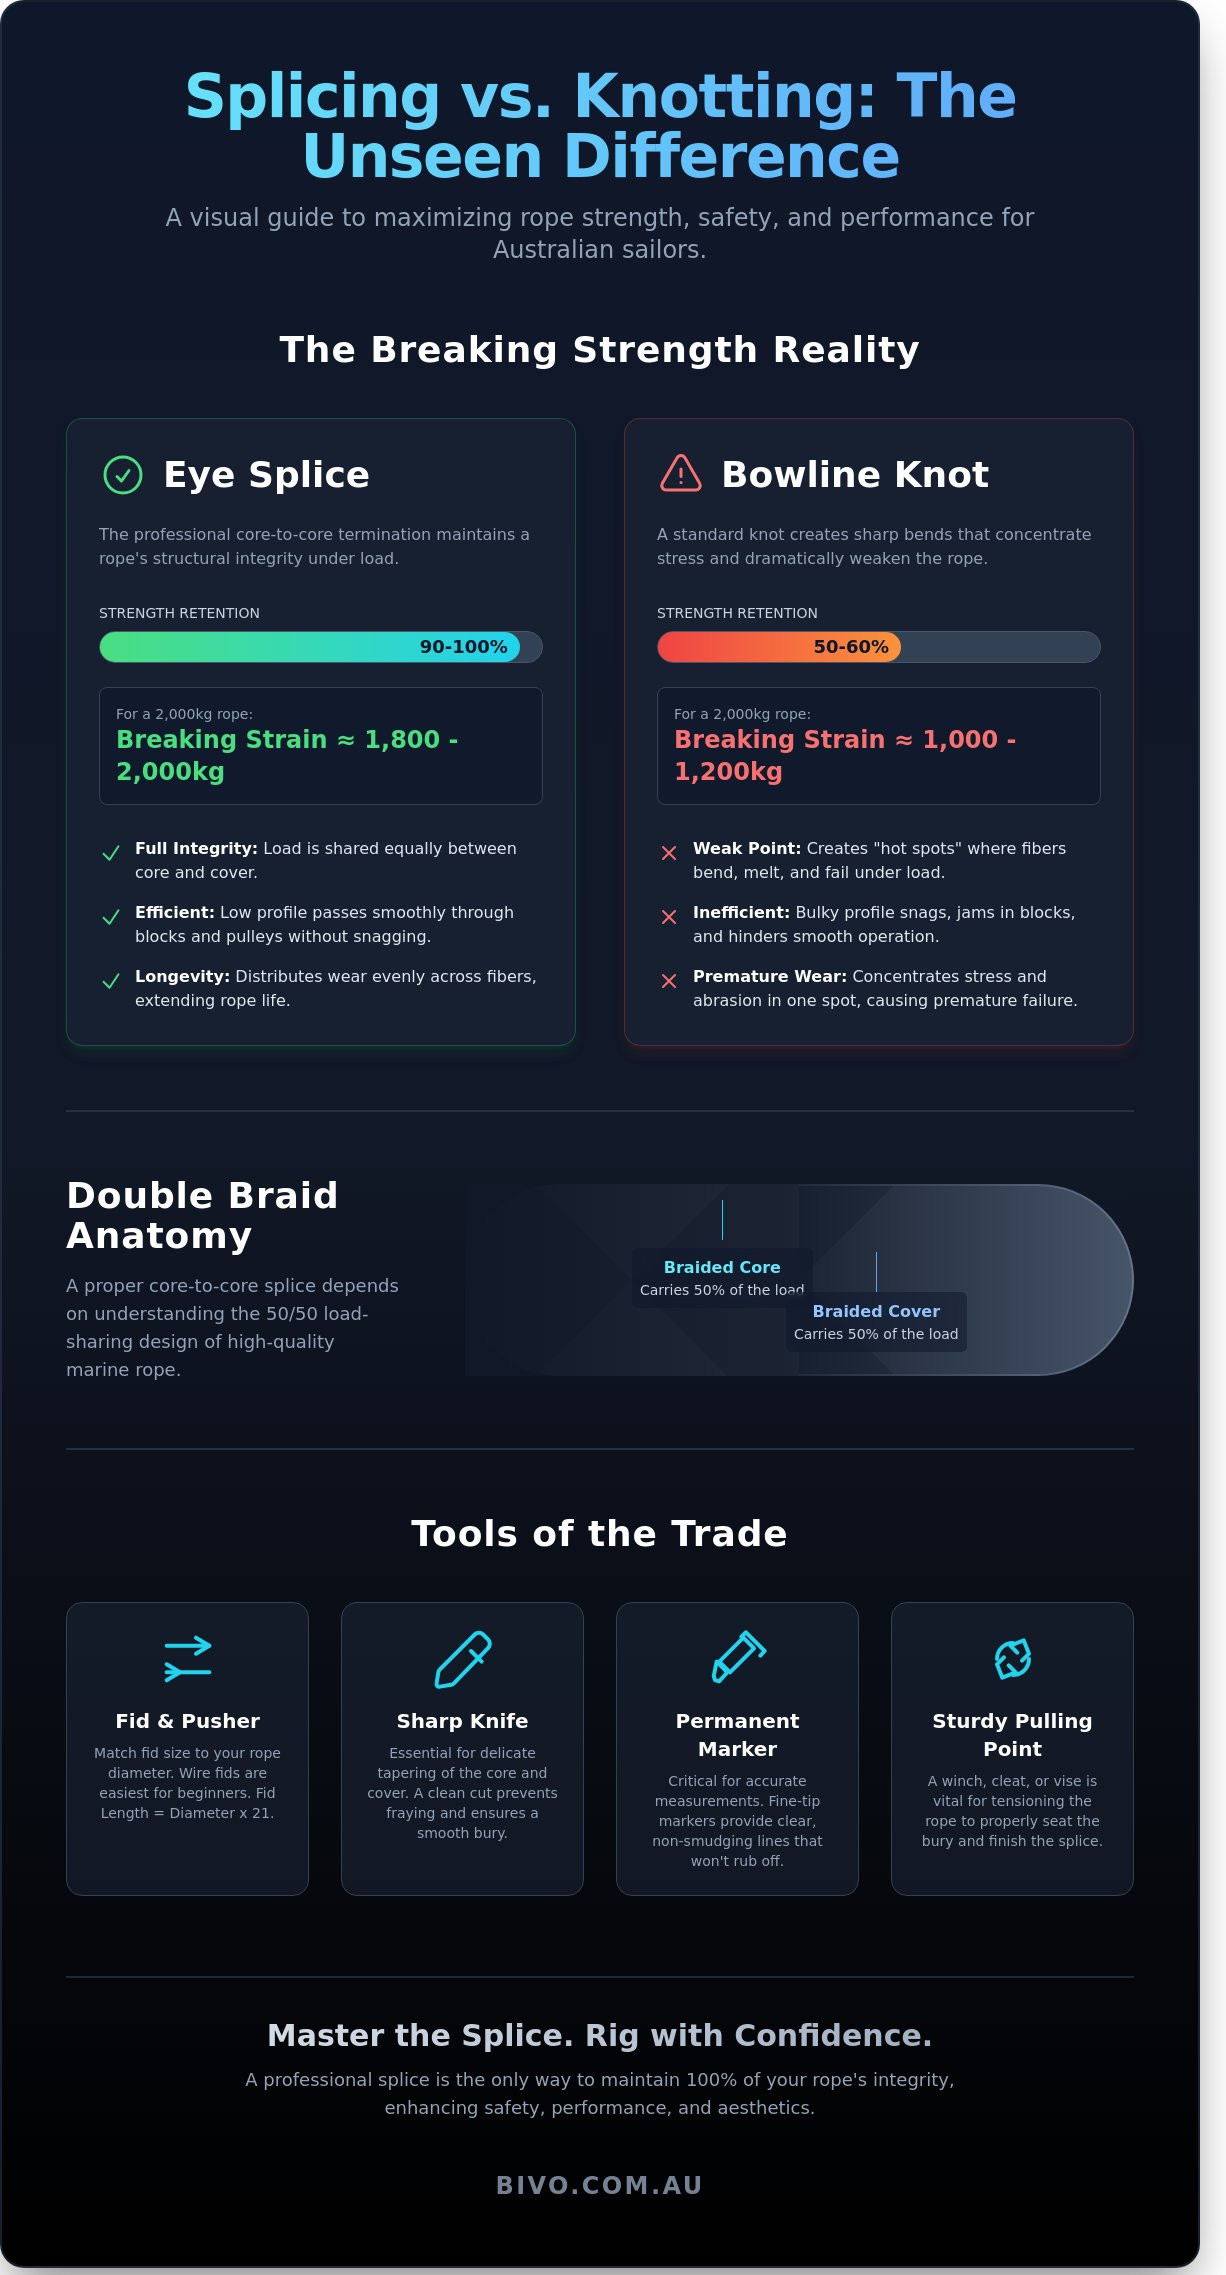
Splices vs. Knots: The Breaking Strength Reality
The "50% Rule" is a harsh reality for sailors. A standard bowline or figure-eight knot can reduce a rope's breaking load by 40% to 50%. If your polyester line has a 2,000kg breaking strain, a knot drops that safety margin to just 1,000kg. Knots create "hot spots" where fibres bend at sharp angles. This creates internal friction that can actually melt synthetic fibres under extreme tension. In contrast, an Eye splice maintains 90% to 100% of the rope's original strength. For halyards, sheets, and mooring lines, a splice is mandatory. It ensures your equipment performs to its rated capacity every time.
- Splice Strength: 90-100% of original breaking load.
- Knot Strength: 50-60% of original breaking load.
- Efficiency: Splices pass through pulleys; knots get stuck.
- Longevity: Splices distribute wear; knots concentrate it.
Understanding Double Braid Anatomy
Double braid rope consists of a braided core protected by a braided cover. In a high-quality 100% polyester marine rope, the load is typically shared 50/50 between these two components. You can't use 3-strand splicing techniques here. Those methods rely on twisting strands together, which doesn't work for braid-on-braid construction. Before you start, identify the quality of your material. Premium ropes have a tight, consistent weave. Cheap imitations often feel "mushy" or have loose covers that will bunch up during the splicing process. Knowing how to splice double braid rope correctly requires understanding this internal balance to avoid catastrophic failure under load.
Tools of the Trade: What You Need Before You Start
Success in splicing is rarely about physical strength. It's about having the right kit and a clean workspace. You can't achieve a professional finish with blunt scissors or a rough estimate. Precise measurements and specialized tools ensure the rope retains its full breaking load after the job is done. Having spent 30 years in the industry, we've seen many DIY jobs fail simply because the wrong tools were used.
A standard fid kit is your most important investment. Choose a kit that matches your rope's diameter exactly. If you're working with 12mm line, you need a 12mm fid. Using the wrong size creates unnecessary friction and can snag the internal fibres. For marking, skip the chalk. It rubs off too easily during the "milking" process. Use a fine-tip permanent marker for high-visibility lines that stay put while you work. These marks are critical for maintaining the structural integrity of the eye.
Cutting requires a razor-sharp knife rather than a hot wire. While a hot wire is excellent for sealing a finished end, a sharp blade is necessary for the delicate tapering required in a double braid splice. Refer to New England Ropes' splicing guide to see how these tapers affect the final bury. Finally, find a sturdy pulling point. A winch or a heavy-duty cleat is essential for tensioning the rope and seating the splice correctly. This mechanical advantage is vital when learning how to splice double braid rope for the first time.
Choosing the Right Fid and Pusher
Beginners should opt for wire fids. They're easier to pull through tight covers than traditional tubular fids. Calculate your fid length by multiplying the rope diameter by 21. A 10mm rope requires a 210mm fid for proper leverage. BIVO Pro Tip: If you're caught in an emergency without a kit, a bent wire coat hanger or a large knitting needle can substitute for a fid in a pinch. It isn't ideal, but it gets the job done when you're away from the dock and need a quick fix.
Workstation Setup for Success
Clear at least 3 metres of floor space before you begin. You need room to stretch the rope and move freely without tangles. Secure the "standing part" of the rope to a fixed object using a basic hitch. This prevents core-creep, a common issue where the inner core slides inside the cover and ruins your measurements. Safety is a priority. Use a pair of leather-palmed gloves to protect your hands from friction burns if the rope slips under tension. If you need fresh supplies, browse our range of premium marine ropes and accessories to ensure you have the best materials for the task.
The Step-by-Step Guide to the Double Braid Eye Splice
Learning how to splice double braid rope requires patience and the right tools. At Bivo, we've spent 30 years refining these techniques to ensure every eye splice meets professional marine standards. Follow these steps carefully to achieve a high-strength finish that looks as good as it performs.
Precision Marking and Extraction
Success begins with accurate measurements. First, mark the cover at one fid length from the bitter end; this is Mark 1. Measure your desired eye size and make Mark X where the eye will close. It's vital to allow for 10 percent shrinkage during the bury process. For a 12mm polyester rope, this typically means adding an extra 15mm to your eye circumference measurement to ensure the final loop is the correct size.
- Mark 1: One fid length from the rope end.
- Mark X: The point where the splice closes to form the eye.
- Mark 2: A mark on the core indicating where it exits the cover.
Perform the "Prick and Pull" by using a marlinspike or a small fid to separate the cover strands at Mark X. Gently pull the core through this opening until the end is free. Don't use sharp knives for this extraction. Snagging even one structural fibre can reduce the rope's breaking strain by 15 percent or more. Once the core is out, pull enough length to work comfortably without losing your marks.
The Bury and Tapering Process
The transition between the core and cover must be seamless to maintain rope integrity. This is where the "4-8-12" tapering method is essential. By cutting and removing pairs of strands at three distinct intervals, you create a conical shape. This graduated profile allows the rope to slide into the tunnel without bunching. A blunt or untapered end is the most common reason for a failed splice.
Use your fid to lead the core back into the cover tunnel. Maintain a constant tension pull throughout this stage. This prevents the interior fibres from twisting or "hockling," which creates weak spots. Once the core is seated, the final step is "milking" the cover. Start from the eye and slide your hands firmly down the standing part of the rope. This action pulls the cover back over the buried section. It requires significant physical effort. A well-executed splice retains 90 percent of the rope's original strength, whereas a standard bowline knot can reduce that strength by up to 50 percent.
If you're unsure about the tension, remember that Bivo's experts are here to help you. We've seen every mistake in the book over three decades, and we know that a smooth bury is the mark of a professional job.
Avoiding "The Milk": Troubleshooting Common Splicing Mistakes
Learning how to splice double braid rope requires patience. Even pros with 30 years of experience face friction issues. The most common hurdle is the "bunching" problem. This happens when the bury gets stuck halfway through the cover. If this occurs, don't force it. You'll likely damage the internal fibres. High tension during the bury can lead to a 15% loss in the rope's ultimate breaking strength if the strands are distorted.
The "Milk" technique is your primary solution. Firmly grasp the rope and slide your hand down the cover towards the splice. You're effectively "milking" the excess slack back over the buried core. If the cover won't budge, the core might be twisted inside. A "blown" splice is one where the cover fibres have frayed or the internal tension is visibly uneven. If you see visible snags or a 10% reduction in rope diameter due to stretching, cut it off. It's safer to start again than to trust a compromised eye loop.
To prevent the core from disappearing into the rope, use a small piece of electrical tape or a temporary stitch. This keeps the core tail accessible while you work the cover. It's a simple step that saves 15 minutes of frustration and prevents the need to fish the core out with a wire hook.
Dealing with High-Friction Ropes
New polyester rope is significantly harder to work with than used line. The fibres are tight; they haven't been broken in by winch drums or blocks. If the bury is too stiff, apply a small amount of marine-grade lubricant or diluted dish soap. This reduces friction by up to 40% during the pull-through. For stubborn sections, use a rubber mallet. Lightly hammering the splice on a flat surface settles the fibres. This creates the necessary internal space for the bury to slide home without snagging.
Common Measurement Errors
Your eye loop might end up 20mm smaller than planned if you don't account for rope take-up. Splicing consumes length. Always add a 5% margin to your initial measurements to ensure the finished eye fits your hardware. A lumpy splice usually indicates a poor internal taper. You must thin the core tail gradually over a 100mm distance to ensure a smooth transition. Before applying a full load, verify the lock by performing a manual pull test. A properly executed splice should hold the rope's rated breaking strain without slipping or showing gaps in the cover. Mastering how to splice double braid rope is about precision, not just strength.
Need a fresh coil to practice your technique? View our range of high-quality double braid ropes and get back on the water faster.
Practical Applications and Rope Care for Australian Boaters
Mastering how to splice double braid rope changes your approach to deck hardware. Instead of relying on bulky knots that reduce rope strength by up to 50%, you can now create sleek, professional terminations. Use this skill to build custom dock lines that fit your slip perfectly or fender whips that won't slip. For heavy-duty applications, we recommend whipping the throat of your splice. This secondary safety lock provides peace of mind during the 40-knot gust events common on the Australian coast. It prevents the bury from creeping when the line is slack or surging.
The local climate is brutal on synthetic fibres. High UV levels and salt ingress are the primary enemies of your rigging. Salt crystals penetrate the cover and grind against the core under tension. Over time, this causes internal abrasion that isn't always visible from the outside. You should retire any rope that feels "crunchy" or shows significant glazing on the cover. We've seen lines lose 30% of their breaking strain in just two seasons of neglect in harsh Queensland or Western Australian conditions. Knowing how to splice double braid rope allows you to refresh your ends, but it won't save a UV-damaged core.
Customising Your Rigging
Upgrade your eye splice by inserting a 316-grade stainless steel thimble. This protects the polyester from chafe against metal shackles or bow rollers. You can also use these techniques to create "soft shackles." These lightweight alternatives to steel are safer and won't rattle against your gelcoat or mast. If you need high-quality material to start your project, explore our range of Double Braid Polyester Marine Rope for reliable performance and value.
Cleaning and Longevity
Longevity starts with a simple freshwater rinse. Salt buildup accelerates wear, so hose down your spliced lines after every salt-water outing. This keeps the fibres supple and easy to handle. When storing, avoid tight coils that create a "set" or permanent memory kinks in the core. A loose flake in a dark, ventilated locker is the best practice. Before every trip, perform a quick 10-second inspection. Look for these specific signs of wear:
- Cover fuzz: Excessive pilling indicates surface abrasion.
- Hard spots: This suggests internal melting from extreme friction or heavy loading.
- Discolouration: Significant fading is a clear sign of UV degradation.
- Diameter changes: Thinned sections mean the internal core is compromised.
At Bivo, we've spent 30 years supplying the Australian marine industry. We know that the right care saves you money and keeps your vessel secure. If you're unsure about the state of your rigging, we're here to help you choose the right replacement for your specific boat.
Take Command of Your Rigging
Learning how to splice double braid rope is a critical skill for any Australian boater who values safety and vessel performance. By following these technical steps, you ensure your lines maintain their maximum breaking strength. Standard knots can reduce a rope's integrity by up to 50%, but a well-executed eye splice provides a streamlined, professional finish that won't snag. Mastering the transition between the core and cover helps you avoid the milk and guarantees your lines remain balanced under heavy loads.
Bivo has served the local marine sector for over 30 years, building a reputation as a reliable veteran in the industry. We offer specialized wholesale and trade hardware pricing to provide genuine value for money. Our Sydney-based warehouse is optimized for rapid dispatch, ensuring your orders move quickly from our shelves to your deck. We prioritize straightforward, high-quality gear that withstands the demanding Australian climate.
We're here to help you get the most out of your time on the water. Grab your fids, take your time with the measurements, and enjoy the confidence of a perfectly spliced line.
Frequently Asked Questions
Does splicing double braid rope reduce its strength?
Splicing double braid rope actually maintains its strength better than any knot. While a standard bowline reduces a rope's breaking strength by 50%, a professional eye splice retains 90% to 100% of the original load capacity. This makes splicing the safest choice for high-load marine applications. We've seen this reliability firsthand across 30 years of rigging experience in the Australian marine industry.
What is the best fid for splicing 10mm double braid rope?
A 10mm Selma fid or a 10mm tubular aluminum fid is the best tool for this job. For 10mm double braid, the fid should have a diameter that matches the rope's thickness to ensure smooth passage through the cover. Investing around A$35 for a quality set of stainless steel fids will save you time and prevent snagging during the process. These tools are essential for a professional finish.
Can I splice used double braid rope?
You can splice used rope, but it's significantly harder than working with new material. Salt crystals and UV exposure make the fibers stiff and the cover tightens over the core. If the rope is more than 2 years old or shows visible salt crusting, you'll need to soak it in warm water with a mild fabric softener for 12 hours first to lubricate the fibers and loosen the weave.
How much extra rope do I need for a double braid eye splice?
You should allow for 1.5 to 2 meters of extra length when learning how to splice double braid rope. This provides enough tail for the core-to-cover transitions and the final burying process. For a standard 10mm rope, we recommend measuring at least 2 full fid lengths for the eye and an additional 1 meter for the tail to ensure you have adequate leverage during the pull.
Is a cover-only splice safe for mooring?
No, a cover-only splice is not safe for mooring because it ignores the core, which carries 50% of the total load in double braid construction. This type of splice will fail under heavy surge loads common in Australian coastal berths. Always use a full core-to-cover eye splice for any critical application where safety and vessel security are at stake. It's the only way to ensure 100% reliability.
What is "milking" in rope splicing?
Milking is the process of smoothing the outer cover back over the internal core once the splice is completed. You start from the eye and use a firm, downward stroking motion toward the standing part of the rope. This removes slack and ensures the cover is evenly tensioned. It's a vital step to ensure the splice achieves its full 100% rated breaking strength and looks professional.
Do I need to whip a double braid splice?
You should always whip the throat of a double braid splice to prevent the core from slipping under low-load conditions. Use a waxed polyester twine and apply a 15mm long whipping just below the eye. This small addition costs less than A$2 in materials but provides a permanent lock that ensures your splice remains secure for its entire service life. It's a standard practice we've recommended for 30 years.
Why is my double braid core so hard to pull out?
Your core is likely stuck because the outer cover hasn't been "bunched" or pushed back sufficiently to create slack. If the rope is under any tension, the cover acts like a Chinese finger trap and locks onto the core. Try pushing the cover toward the splice point to create a 10% increase in diameter. This loosens the weave and allows the core to be extracted without damaging the fibers.