

Most new anglers lose their first 45 minutes of fishing time to tangled lines and slipping knots before they even cast. It's a common hurdle that can ruin a morning on the Murray or a trip to the coast. We've spent 30 years as a trusted authority in the Australian marine industry, and we know that learning how to set up a pole for fishing is the single most important skill you'll acquire in 2026. You want a setup that's functional and reliable, not a mess of wasted monofilament that costs you A$20 in lost tackle.
We agree that the technical side of gear shouldn't feel like a chore. This guide provides a clear, step-by-step path to mastering your equipment with total confidence. You'll learn to rig your rod with a castable setup that stays secure, even when you're fighting your first catch. We're going to break down the essential terminology and show you exactly how to avoid those dreaded bird's nests. By the end of this article, you'll have the technical knowledge to fish independently and get your line in the water faster than ever before.
Key Takeaways
- Identify the essential components of your gear to build a foundation of technical knowledge and on-water confidence.
- Master how to set up a pole for fishing using our professional assembly guide, ensuring perfect guide alignment and secure reel attachment every time.
- Learn the specific knots and spooling techniques required for Australian monofilament and braid lines to prevent gear failure.
- Get step-by-step instructions for rigging a Paternoster setup, the gold standard for success in local Australian estuary environments.
- Avoid the "Saltwater Tax" with practical maintenance routines that preserve your gear’s value and performance in harsh marine conditions.
Understanding Your Gear: The Anatomy of a Fishing Pole
Learning how to set up a pole for fishing begins with identifying your equipment. While many use the terms interchangeably, a "pole" technically refers to a fixed-length tool without a reel. Most Australians actually want a fishing rod. A rod uses a reel and guides to manage line. At Bivo, we've spent 30 years helping anglers choose the right gear for local conditions. We know that a solid foundation prevents tangles and lost fish.
The three core components include the blank, the reel, and the line. The blank is the actual stick, usually made from carbon fiber or fiberglass. Modern 2026 designs prioritize high-modulus carbon for sensitivity. You need to match these parts to your target species. A setup for Bream in a Sydney estuary differs significantly from a heavy offshore rig. Our experience shows that matching your gear to the environment is the first step toward a successful day on the water.
Anatomy of the Fishing Rod
The rod starts at the butt and handle. Most handles use EVA foam or cork. Cork provides a classic feel, while EVA lasts longer in harsh Australian salt water. Above the handle is the reel seat. This threaded mechanism locks your reel in place. It must be tight to prevent wobbling during a retrieve. The Anatomy of a Fishing Pole includes the guides and the tip. These circular loops lead the line from the reel to the water. Quality guides use ceramic inserts to reduce friction. This prevents the line from heating up and snapping under pressure.
Rod "power" describes how much weight is needed to bend the blank. A "Medium" power rod is the best starting point for 90% of beginners. "Action" describes where the rod bends. A "Fast" action rod bends in the top 25% of the blank. This gives you better hook sets and increased sensitivity. Understanding these technical specs ensures you don't overspend on gear that doesn't fit your needs. We're here to help you make the right choice.
Choosing Your First Reel
Spinning reels are the industry standard for beginners in 2026. They sit underneath the rod and use an open-face design. Unlike baitcasters, spinning reels rarely bird-nest or tangle. This saves you time and frustration. For general purpose fishing in Australia, look for a 2500 or 3000 size reel. These sizes are versatile enough for flathead, snapper, or trout. When you are learning how to set up a pole for fishing, the reel is your most technical investment.
Check the gear ratio before you buy. A 5.2:1 ratio means the internal spool rotates 5.2 times for every one turn of the handle. This is a balanced speed for most lures and baits. The drag system is your safety net. It's a series of friction discs that allow a fish to pull line off the spool under tension. Set your drag to roughly 25% of your line's breaking strain. If you're using 4kg line, set the drag to 1kg. This prevents the line from breaking when a fish makes a sudden lunge. Quality gear offers better value for money over the long term. We focus on providing reliable equipment that stands up to the elements.
- Spinning Reels: Best for beginners and light-to-medium tackle.
- Baitcasters: Require more skill but offer pinpoint casting accuracy.
- Gear Ratio: Higher numbers mean faster line retrieval.
- Drag: Essential for protecting your line from snapping on big fish.
Assembling the Rod and Reel: A Step-by-Step Guide
Understanding how to set up a pole for fishing starts with a solid physical connection between your rod and reel. This foundation determines your casting accuracy and your ability to fight a fish without equipment failure. At Bivo, we've spent 30 years helping Australians get on the water with reliable gear. A secure assembly is the first step to a successful day at the jetty or on the boat. It's a simple process, but doing it correctly prevents damage to your investment.
Joining the Rod Sections
Most modern fishing rods come in two or more pieces for easy transport. To join them, align the guides roughly and push the male end, known as the ferrule, into the female opening. Use a slight twisting motion as you push to create a secure friction fit. Don't force the pieces together with excessive power. You want the connection to be snug but not permanent. If you find the sections are difficult to separate later, don't use pliers. Instead, use a piece of rubber grip or have two people pull the sections straight apart without twisting.
Proper alignment is vital for performance. Hold the rod at eye level and look down the length from the butt toward the tip. This "eye-to-eye" method ensures every guide sits in a perfectly straight line. Misaligned guides create unnecessary friction on your line. This friction can reduce your casting distance by up to 15% and cause premature line wear. For those who want a broader look at gear basics, this Beginner's Guide to Fishing provides excellent context on foundational equipment.
Mounting the Reel Properly
The reel seat is the mechanical link between your hands and the fish. Start by unscrewing the locking nut, often called the collar, to open the hoods. Slide the reel foot into the fixed hood first; then bring the sliding hood over the other end of the foot. When learning how to set up a pole for fishing, many beginners make the mistake of over-tightening this component. Turn the locking nut until it's firm. Avoid over-torquing, as this can crack graphite or plastic reel seat components. A firm hand-tighten is all you need for a secure fit.
Verify that the reel is perfectly centered with the first guide, which is the large "stripper guide" closest to the handle. If the reel sits at an angle, your line won't flow smoothly off the spool during a cast. This leads to tangles and wind knots. Give the reel a firm wiggle once it's tightened. If you feel any movement or "play," tighten the collar another half-turn. A loose reel causes vibrations that can spook fish and eventually wear down the mounting hardware.
Apply a single drop of marine-grade lubricant to the reel seat threads once every 6 months. This prevents salt buildup and ensures the locking nut doesn't seize over time. Over our 30 years in the industry, we've seen hundreds of high-quality rods ruined by "frozen" reel seats that a simple A$10 bottle of lubricant could have prevented. If you're looking for professional maintenance supplies to protect your gear, browse the range of marine accessories at Bivo.
Testing the "seat" before you add line saves time at the water's edge. Once the rod is assembled and the reel is mounted, hold the setup as if you're casting. The balance point should feel natural. If the rod feels tip-heavy or the reel feels unstable, re-seat the foot and check the ferrule connections again. Taking two minutes to ensure everything is tight and true prevents mid-trip repairs when the fish are biting.
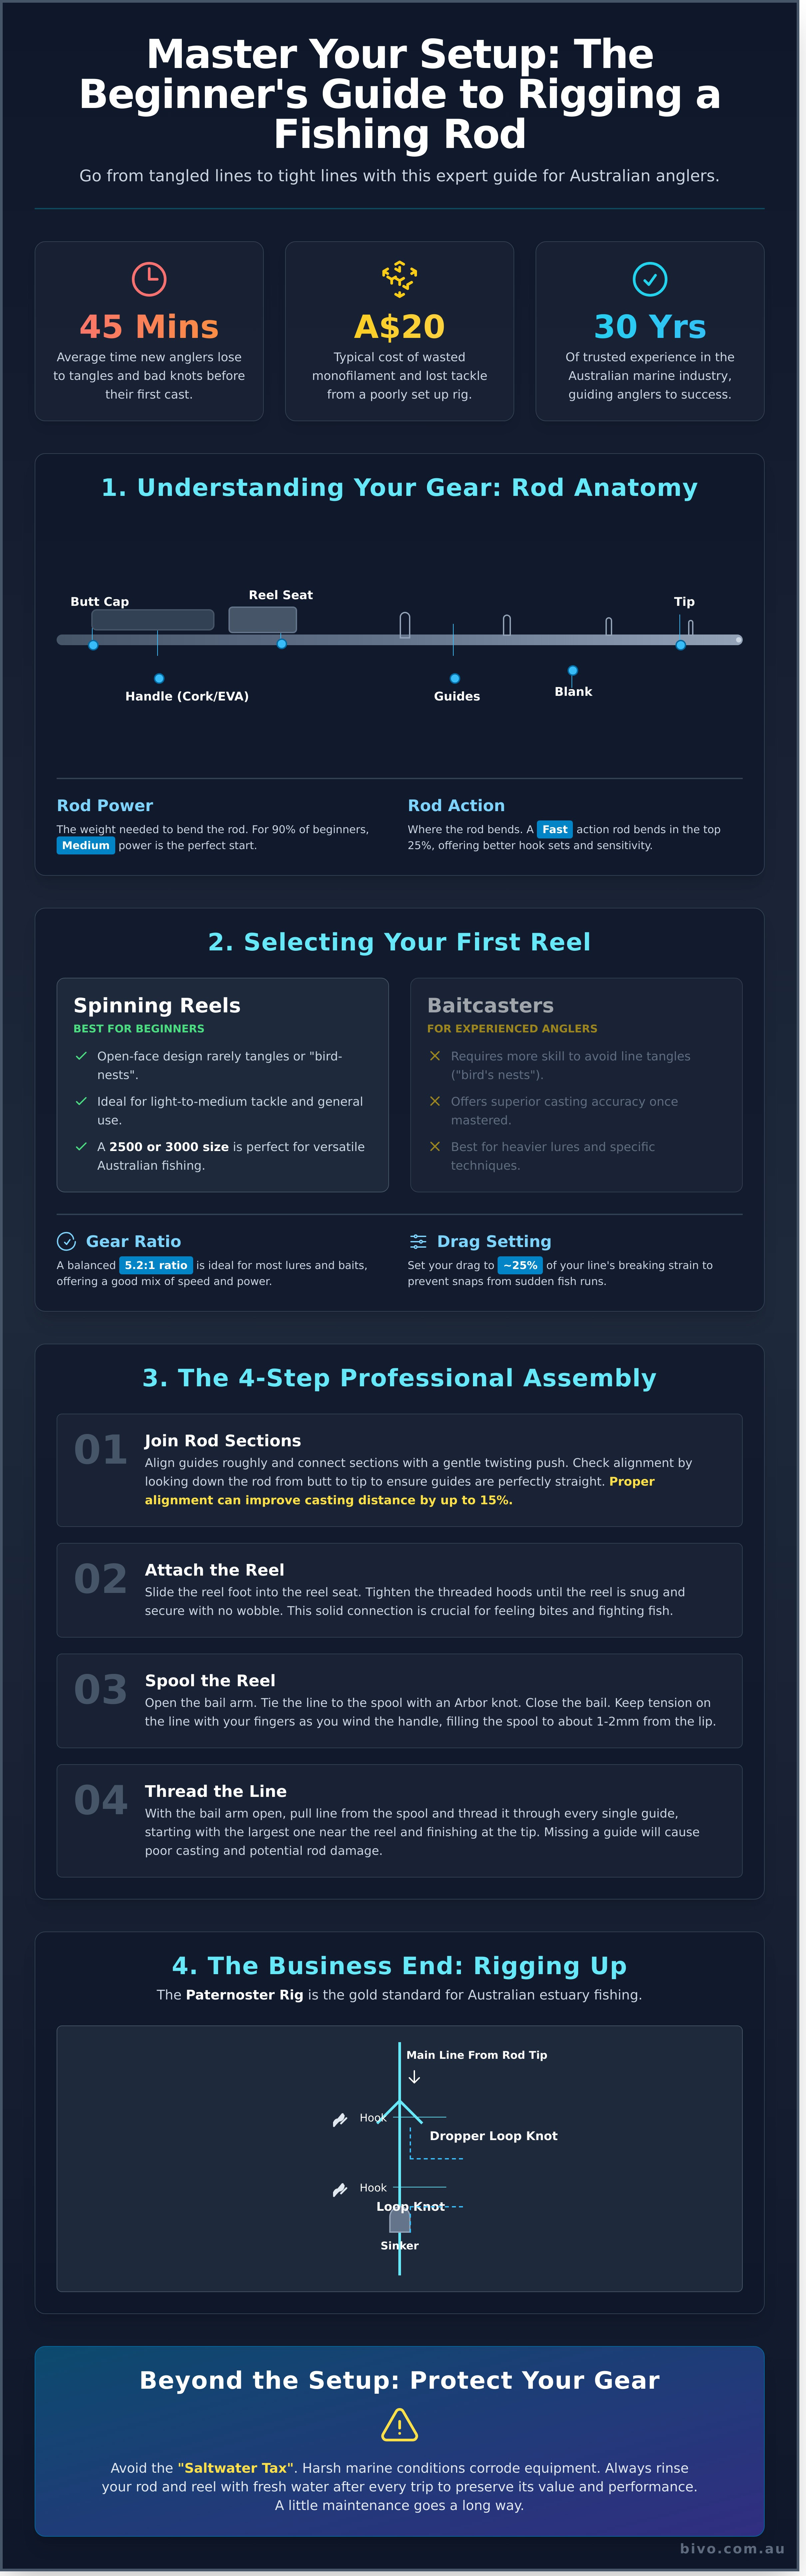
Spooling the Reel and Threading the Line
Choosing the correct line is your first step toward a successful day on the water. Australian conditions demand gear that handles high UV levels and sharp reef structures. For most beginners, monofilament line is the best choice. It has a 20% to 25% stretch factor, which acts as a shock absorber when a fish strikes. Braided line offers more sensitivity but requires advanced knot-tying skills. This Beginner's Fishing Guide provides additional context on gear selection if you're starting from scratch. At Bivo, we've spent 30 years helping fishers select the right 4kg to 7kg line for local species like Flathead or Bream.
The Arbor Knot is the only knot you need to attach your line to the spool. It's a simple, effective connection that won't slip under pressure. Once the knot is tight, you must maintain constant tension. Loose line on a spool is the primary cause of "birds nests" or wind knots. Use your thumb and forefinger to grip the line about 30cm above the reel as you wind. This ensures the line packs tightly and evenly. Learning how to set up a pole for fishing correctly now saves hours of frustration on the water later. Proper tension is the difference between a smooth cast and a tangled mess.
How to Spool a Spinning Reel
Open the bail arm before you tie your Arbor Knot. If you forget this step, you won't be able to retrieve line. Place a pencil through the center of the new line spool and have a friend hold it. This allows the spool to rotate freely, preventing line twist. Wind the handle steadily. Stop when the line is 2mm to 3mm from the edge of the spool rim. Overfilling causes the line to spill off in clumps. Underfilling reduces your casting distance by 15% or more. We've found that leaving this small gap provides the best balance of line capacity and casting performance.
Threading Through the Guides
Close the bail arm once the spool is full. Pull out approximately two meters of line to begin threading. You must pass the line through every single guide on the rod. Start at the largest guide near the reel and work toward the tip. Missing even one small guide near the top creates uneven pressure. This can snap a carbon fiber rod under a heavy load. It's a common mistake that ruins a day of fishing. Take your time and check your work twice.
Hold the line tight at the tip once you reach the end. You can wrap it around the reel handle or a guide leg to stop it from slipping back through. Double check your work. Ensure the line isn't wrapped around the rod blank between the guides. This process is a foundational skill when mastering how to set up a pole for fishing. Our team has refined these techniques over three decades to ensure every customer gets the best performance from their marine gear. Proper tension and guide alignment are the hallmarks of a professional setup that lasts for years.
The Business End: Tying Knots and Rigging Tackle
Learning how to set up a pole for fishing requires a focus on the connection points. We have spent 30 years helping Australian anglers get on the water; we know that a weak knot is the fastest way to ruin a trip. Your rig is the only thing between you and the fish. It must be secure, tidy, and suited to the specific environment you are fishing in. Whether you are targeting Bream in a local creek or Flathead in a sandy estuary, your terminal tackle setup dictates your success rate.
The Improved Clinch Knot is the foundation of every beginner's kit. It provides roughly 95% of the original line strength when tied correctly. To tie it, thread the line through the hook eye and wrap the tag end around the main line 5 to 7 times. Pass the end through the small loop next to the eye, then back through the larger loop you just created. Lubricate the line with water or saliva before pulling it tight. This prevents friction heat from weakening the monofilament. Always leave exactly 3mm of tag end when trimming. Cutting it flush can lead to the knot slipping when a heavy fish lunges.
Essential Beginner Knots
The Palomar Knot is your best option for braided lines. It's nearly impossible to break and won't slip on slick synthetic fibres. Double about 15cm of line and pass it through the hook eye. Tie a loose overhand knot with the doubled line. Pass the hook through the remaining loop and pull both ends to tighten. Use sharp scissors for trimming. Dull blades fray the line, which can lead to tangles during your cast.
Basic Rigging for Success
A Running Sinker Rig is the most effective setup for bottom feeders like Bream and Flathead. Slide a size 1 or 2 ball sinker onto your main line, followed by a small plastic bead to protect the knot. Tie on a swivel, then attach a 50cm leader of fluorocarbon line ending in a size 4 bait holder hook. This allows the fish to pick up the bait and swim without feeling the weight of the sinker. It results in more confident strikes and better hook sets.
For surface feeders like Garfish or Mullet, a Float Rig is the superior choice. Use a weighted pencil float to keep your bait suspended in the top 1 metre of the water column. This keeps your hook away from snags and puts the bait exactly where these species feed. If you are fishing deeper water with high current, switch to a Paternoster rig. This setup places the sinker at the very bottom with two hooks on "droppers" above it. It keeps your bait stationary and visible even in heavy tidal flow.
Before you cast, perform a final safety check. Hold the rod firmly and give the hook a sharp, steady pull with a pair of pliers. It is better to have a knot fail on the bank than in the water. We are here to help you find the right gear for your next weekend adventure. You can find all the components for these setups in our professional tackle range.
Choosing the right hook size is the final step. For most Australian estuary species, a hook between size 6 and size 2 is ideal. Smaller hooks are harder for fish to see and result in more frequent hookups. If you are using live prawns, a size 4 long shank hook provides the best presentation. Consistent results come from these small, technical adjustments. Trust our 30 years of industry experience; getting the basics right today means more fish in the bucket tomorrow.
Beyond the Setup: Protecting Your Gear in Marine Environments
Learning how to set up a pole for fishing is your first step toward a successful day on the water. The work doesn't end when you land your last catch. Australia’s coastal environments are incredibly harsh. Salt air and UV exposure act as a "saltwater tax" that can destroy a A$300 setup in less than 12 months if you neglect basic maintenance. Salt crystals are abrasive and hygroscopic. This means they pull moisture from the air to accelerate corrosion on metal parts even when the gear looks dry.
Post-trip care starts with a gentle freshwater rinse. Never use a high-pressure hose on your reels. High pressure forces salt and grit past the seals and into the internal bearings. This causes permanent grinding and gear failure. Use a light mist to dissolve salt from the line, reel body, and guides. After rinsing, wipe the rod down with a microfibre cloth and let it dry in a shaded, well-ventilated area. Storing rods in high-heat environments like a locked car or a tin shed can weaken the graphite fibres. This often leads to a "rod set" or a permanent bend in the blank that ruins the rod's action.
Marine-Grade Maintenance
Corrosion often starts at the guides. Wipe each guide with a rag dampened with a silicon-based lubricant to prevent rust from eating into the frames. You should also loosen your reel’s drag system completely before storage. Keeping the drag tight compresses the washers. This leads to "stiction" and jerky performance the next time you hook a fish. If you’ve added DIY lighting to your boat-mounted rod holders, ensure all wiring is sealed with heat shrink connectors to prevent the "green rot" common in marine electrical systems.
Integrating Your Setup with Your Boat
A secure rod setup depends on a stable boat. Ensure your vessel is held firmly in place by using double braid polyester marine rope for your anchor lines. This material offers superior UV resistance and strength compared to cheaper hardware store alternatives. If you use a fish finder to locate schools, ensure your unit is powered by high-quality rechargeable batteries to avoid mid-trip power failures. Bivo has spent 30 years providing these practical solutions to Aussie fishers. We know that reliable gear is the difference between a great day and a frustrating one.
Before you head out, run through this final checklist to ensure you’re ready for the Australian coast:
- Rod and Reel: Checked for cracks and smooth drag operation.
- Tackle: Fresh hooks and leader line (UV degrades mono quickly).
- Boat Gear: Anchor ropes inspected and electronics charged.
- License: Current Australian state-specific recreational fishing license.
We're here to help you get the most out of your time on the water. Proper maintenance protects your investment and ensures your gear performs exactly when you need it most. Once you know how to set up a pole for fishing, keeping it in top condition is the best way to guarantee years of reliable service. Our team is always available to provide the technical advice you need for your marine electrical and rigging requirements.
Get Your Gear Ready for the Water
Mastering the fundamentals of equipment assembly ensures your time on the coast is productive. You've now learned how to align your rod guides and secure the "business end" with reliable knots. Understanding how to set up a pole for fishing is the first step toward a successful day on the boat or the pier. Proper maintenance is just as vital; rinsing your tackle after every saltwater trip prevents corrosion and protects your investment for the long term.
Quality components make a significant difference when you're battling the Australian elements. Bivo provides trade-quality marine electrical and hardware backed by over 30 years of industry experience. We prioritize your time and budget by offering Fast & Free Delivery Australia Wide on our entire range. We're here to help you find the right tools for your specific needs. Upgrade your marine gear with Bivo’s professional hardware and head out with total confidence. You're ready to make your first cast a great one.
Frequently Asked Questions
Do I need a license to fish in Australia?
Most Australian states require you to pay a recreational fishing fee or hold a current license. In New South Wales, a one-year license costs A$35, while a three-day permit is available for A$7. Victoria requires a license for most adults aged 18 to 70. Always check your local Department of Primary Industries website before heading out. We recommend keeping a digital copy on your phone to avoid on-the-spot fines from fisheries officers.
What is the best line weight for a beginner setup?
A 6lb to 10lb (2.7kg to 4.5kg) monofilament line is the best choice for most beginners. This weight is versatile enough to catch common species like flathead or bream without snapping under moderate pressure. Monofilament is more forgiving than braid because it stretches. It's also much easier to handle when you're learning how to set up a pole for fishing for the first time.
How often should I change the fishing line on my reel?
You should replace your monofilament fishing line at least once every 12 months. Exposure to UV rays and saltwater degrades the plastic, leading to brittle sections and lost fish. If you hit the water more than twice a week, consider respooling every 6 months. Check for nicks or tight "memory" coils by running the line through your fingers. Fresh line ensures your knots hold firm during a fight.
Can I use the same rod for freshwater and saltwater fishing?
You can use the same rod for both environments, provided you rinse your gear thoroughly with fresh water after every saltwater session. Salt crystals cause visible corrosion on guides and reel components within 48 hours if left untreated. A 7-foot medium-action rod works well for Murray Cod in rivers or Flathead in estuaries. Just ensure your reel's drag system is sealed to protect the internal bearings.
Why does my fishing line keep tangling when I cast?
Tangling usually happens because the spool is overfilled or the line was wound on without enough tension. Leave a 3mm gap between the line and the edge of the spool rim to prevent "wind knots" during your cast. If you're learning how to set up a pole for fishing, ensure the line comes off the supply spool in the same direction the reel turns. This prevents internal twisting and bird's nests.
How do I know if my drag is set correctly?
Set your drag to approximately 25% or 30% of your line's breaking strain. If you're using an 8lb line, the drag should give way at about 2lb of pressure. You can test this by hooking your line to a handheld spring scale and pulling steadily. It should release smoothly without any jerking. A properly set drag prevents the line from snapping when a large fish makes a sudden run.
What is the best time of day to go fishing for beginners?
The 90-minute windows around sunrise and sunset are the most productive times for new anglers. Fish are naturally more active in low-light conditions because they feel safer from birds and other predators. Overcast days also provide excellent results throughout the afternoon. Check local tide charts and aim to fish the two hours leading up to high tide. This is when baitfish move into the shallow estuaries.
This peaceful time outdoors is a shared appeal for many recreational activities, from fishing to hunting. For those who enjoy a variety of outdoor hobbies, finding the right equipment is key, and a good resource for this is Vse za Lov in Prosti Čas.
Should I use bait or lures when I am first starting out?
Start with natural bait like frozen prawns, squid, or beach worms to increase your success rate. Bait releases scents that attract fish even if your casting technique isn't perfect yet. Lures require specific retrieval movements and constant casting, which can be frustrating for novices. Once you're comfortable with rod handling and knot tying, try a 70mm soft plastic lure to expand your technical skills.